")
Kitchen Paint Finish Guide for a Flawless Update
Did you know that over 65 percent of homeowners who paint their kitchens report higher satisfaction with their space? A fresh coat of paint can breathe new life into any kitchen, but a flawless finish starts long before the brush ever touches the wall. From prepping greasy surfaces to picking the right paint finish, each step plays a crucial role in creating a result that looks stunning and lasts through daily wear.
Table of Contents
- Step 1: Prepare and Clean Kitchen Surfaces
- Step 2: Select the Ideal Paint Finish
- Step 3: Mask and Protect Adjacent Areas
- Step 4: Apply Paint for Lasting Results
- Step 5: Inspect and Perfect the Finished Surfaces
Quick Summary
| Key Point | Explanation |
|---|---|
| 1. Clear surfaces before painting | Remove all items from kitchen surfaces to ensure thorough cleaning and a professional paint finish. |
| 2. Choose the right paint finish | Select a suitable finish like eggshell or silk for better appearance and durability based on kitchen usage. |
| 3. Properly mask areas to protect | Use high-quality masking tape and coverings to prevent paint from affecting unwanted surfaces during your project. |
| 4. Apply multiple thin layers of paint | Use a brush or roller to apply several thin coats for a smoother and more even finish, allowing each coat to dry. |
| 5. Inspect finished surfaces carefully | After painting, check surfaces for imperfections in good light and perform touch-ups as needed for a flawless look. |
Step 1: Prepare and Clean Kitchen Surfaces
Get ready to transform your kitchen surfaces by creating the perfect foundation for a flawless paint update. Proper surface preparation ensures your new paint job looks professional and lasts longer.
Begin by clearing all kitchen surfaces completely. Remove small appliances, decorative items, and anything else that might obstruct your cleaning and painting process. According to research from professional decorating resources, thorough cleaning is essential before any painting project.
Your primary goal is to create a pristine surface free from grease, grime, and moisture. Use a multi-purpose degreaser or kitchen cleaner to break down accumulated cooking residues. Work systematically from top to bottom, ensuring you cover every inch of the surface area. A microfibre cloth works best for capturing dirt without leaving lint behind.
After the initial cleaning, use sugar soap to remove any remaining contaminants. This specialised cleaning solution cuts through stubborn grease and prepares surfaces perfectly for painting. Rinse thoroughly with clean water and allow surfaces to dry completely. Moisture is the enemy of a great paint finish, so patience is key.
Pro Tip: Use good quality disposable cloths or dedicated cleaning rags you can discard after use to prevent transferring dirt back onto clean surfaces.
Once your surfaces are spotless and dry, you are ready to move on to the next exciting stage of your kitchen renovation journey. A meticulously prepared surface will reward you with a stunning, long lasting paint finish that looks professionally done.
Check out our guide on kitchen painting techniques for your next steps in achieving a perfect kitchen update.
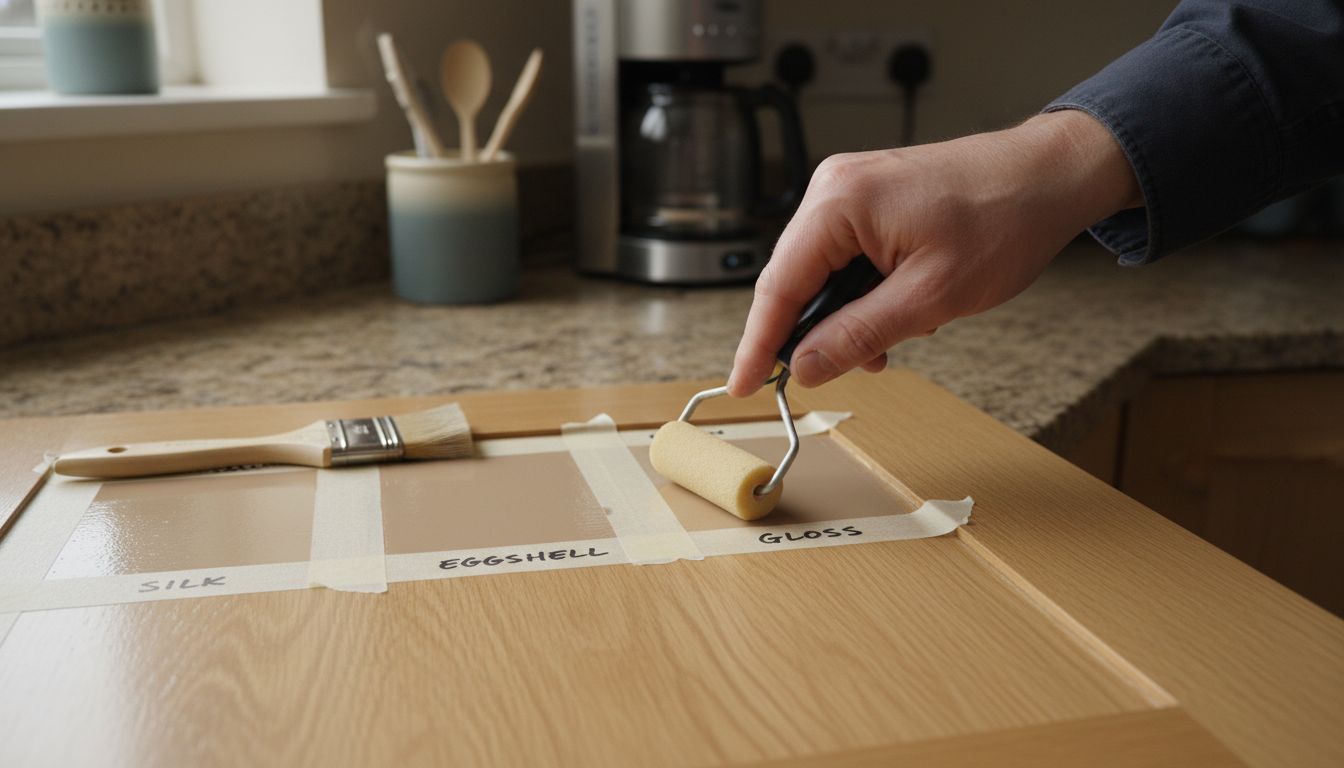
Step 2: Select the Ideal Paint Finish
Choosing the right paint finish can make or break your kitchen renovation project. Your selection will impact both the aesthetic appeal and durability of your kitchen surfaces.
According to research from professional decorating resources, different paint finishes offer unique characteristics that suit various kitchen requirements. Silk emulsion emerges as a popular choice, providing a mid-sheen finish that is both attractive and durable for kitchen environments.
Eggshell paint presents an excellent middle ground between matt and silk finishes. This versatile option works brilliantly on multiple surfaces and offers a smooth appearance that effectively hides minor imperfections. As noted by DIY experts, eggshell paint can conceal brush and roller marks more effectively than other finishes.
Gloss paint remains an option for those seeking a highly reflective surface. However, be aware that its shiny finish tends to highlight surface irregularities. For most kitchen renovations, a softer finish like eggshell or silk will provide a more forgiving and professional look.
Pro Tip: Always purchase a small sample and test your chosen paint finish in a discrete area to ensure it meets your expectations before committing to the entire project.
Consider your kitchen’s lighting, existing colour scheme, and daily wear and tear when making your selection. Each finish has its strengths, and the right choice depends on your specific needs and aesthetic preferences.
Here’s a comparison of common kitchen paint finishes:
| Finish Type | Appearance | Durability | Best For |
|---|---|---|---|
| Silk Emulsion | Mid-sheen Soft gloss |
High | Walls Ceilings |
| Eggshell | Soft Low sheen |
Medium-High | Cabinets Woodwork |
| Gloss | Highly reflective Very shiny |
Very High | Trims Skirting boards |
| Matt | Flat No shine |
Medium | Ceilings Low-traffic areas |
Learn more about selecting the perfect paint with our expert comparison of kitchen paints to help you make an informed decision.
Step 3: Mask and Protect Adjacent Areas
Preparing your kitchen for painting requires careful protection of surfaces and surrounding areas. Your goal is to create a clean workspace that prevents accidental paint splashes and ensures a professional finish.
According to research from professional decorating resources, masking tape is your primary tool for protecting surfaces you do not want to paint. Carefully apply high quality masking tape along worktops, appliance edges, and any areas adjacent to your painting zone. Press the tape down firmly to create a tight seal and prevent paint from seeping underneath.
Use painter plastic sheets or drop cloths to cover larger surfaces such as worktops, flooring, and appliances. Secure these protective coverings with additional masking tape to ensure they remain in place during your painting project. Pay extra attention to covering electrical outlets, switches, and any fixtures that cannot be removed.
As recommended by safety experts, control access to the painting area and consider placing wet paint signs to prevent accidental contact. This not only protects your fresh paint job but also ensures the safety of anyone who might enter the kitchen during the renovation process.
Pro Tip: Use a plastic putty knife or credit card to smooth down masking tape edges. This creates a tighter seal and prevents paint from bleeding under the tape.
Take your time during the masking process. Careful preparation now will save you hours of cleanup and potential touch up work later.
Remember that thorough protection is the key to a flawless paint finish.
Ready to learn more about protecting your kitchen during painting? Check out our guide on kitchen painting techniques for additional expert insights.
Step 4: Apply Paint for Lasting Results
Your moment of transformation has arrived. Applying paint correctly is the key to achieving a professional looking kitchen makeover that will stand the test of time.
According to professional decorating resources, the secret to a flawless finish lies in applying multiple thin layers. Start by using a high quality brush or roller and load it with a small amount of paint to prevent unsightly clumps and drips. Work systematically and maintain a consistent direction to ensure smooth coverage.
As recommended by painting experts, apply at least two thin top coats. Between each coat, allow the paint to dry completely and lightly sand the surface. This technique helps create a smoother finish and improves paint adhesion. Be patient and resist the temptation to rush the process.
Before beginning, carefully read the manufacturer’s safety data sheets and product instructions. Different paint types require specific application techniques and drying times. Pay close attention to temperature and humidity recommendations for optimal results.
Pro Tip: Use natural light to help you spot uneven areas and ensure complete coverage. Move around the kitchen and check your work from multiple angles.
Take your time and maintain a steady hand. Consistent, light strokes will yield a more professional result than heavy handed applications. Remember that preparation and patience are your greatest allies in achieving a stunning kitchen paint finish.
For additional insights into perfecting your painting technique, explore our guide on kitchen painting methods to elevate your DIY skills.
Step 5: Inspect and Perfect the Finished Surfaces
You are now in the final stage of your kitchen painting project. Your careful work and attention to detail will determine the professional quality of your finished surfaces.
After the paint has completely dried, conduct a thorough visual inspection under good natural light. According to professional decorating resources, this is your opportunity to identify and address any subtle imperfections that might have emerged during the painting process.
As recommended by painting experts, use fine grit sandpaper to gently smooth out any minor bumps or uneven areas. Be extremely careful and use a light touch to avoid damaging the fresh paint layer. After sanding, use a HEPA vacuum to remove all dust particles and ensure a clean surface.
Look closely at the painted surfaces from multiple angles. Check for consistency in colour, coverage, and texture. Pay special attention to edges, corners, and areas around fixtures where paint application can be more challenging. Small touch ups now can prevent larger issues later.
Pro Tip: Use a bright LED work light positioned at different angles to reveal subtle inconsistencies that might be missed under normal lighting conditions.
Remember that perfection comes from patience and careful observation. Take your time during this final inspection and address any minor imperfections while the paint is still fresh.
For more detailed guidance on achieving a flawless finish, check out our guide on kitchen painting techniques to refine your skills.
Achieve a Flawless Kitchen Paint Finish with Professional Help
Transforming your kitchen paint finish can be challenging because preparing surfaces, selecting the right paint, and protecting every corner demands precision and patience. The article spotlights key concerns like avoiding paint drips, ensuring durability, and masking effectively to prevent imperfections – all crucial for a beautiful, long-lasting update. If you feel overwhelmed by the detailed steps involved, professional assistance can take the stress away and guarantee expert results.

Discover how our expert kitchen respray service at SKR Specialists professionally handles all the vital stages from surface preparation to flawless application without you having to lift a brush. By choosing our in-situ kitchen respray, you save time, avoid mess, and protect your surfaces with precision masking. Get inspired by the tips in our Uncategorized Archives and learn more about how we make kitchen updates effortless by visiting our main site. Start your kitchen transformation today with confidence and skill you can trust.
Frequently Asked Questions
What is the best paint finish for kitchen cabinets?
Choosing eggshell or silk emulsion is ideal for kitchen cabinets, as they provide a balance of elegance and durability. Opt for a sample of each finish and test them on a small area to see which one complements your kitchen best.
How do I prepare my kitchen surfaces before painting?
Thoroughly clean all surfaces using a multi-purpose degreaser to remove grease and grime. Allow the surfaces to dry completely to ensure that the paint adheres well and lasts longer, taking at least an hour for drying after cleaning.
How many coats of paint should I apply for a lasting finish?
Apply at least two thin coats of paint for optimal results; this enhances coverage and durability. Wait for the first coat to dry completely before lightly sanding and applying the second coat, ideally within 24 hours for best adhesion.
What are the steps to protect areas from paint splatters?
Use high-quality masking tape to cover areas adjacent to your painting project, ensuring a tight seal to prevent paint from seeping underneath. Additionally, cover large surfaces with painter plastic sheets or drop cloths to minimize cleanup later.
How do I identify and fix imperfections after painting?
Inspect the dried paint under good natural light for any uneven areas or color inconsistencies. Use fine-grit sandpaper to smooth out bumps and, if necessary, apply touch-up paint to these spots before the paint fully hardens for easier fixes.