")
Kitchen Respray Troubleshooting for Perfect Colour Match
Colour matching and finish durability are among the top concerns for British homeowners seeking to transform their kitchens. A poorly matched shade or a flaky finish can leave you frustrated instead of satisfied. Over 60 percent of kitchen cabinet resprays in England face complications related to inconsistent colour or premature surface wear. This guide explains how to tackle these common challenges, helping you achieve long lasting results that truly elevate your kitchen space.
Table of Contents
- Step 1: Assess Existing Kitchen Respray Issues
- Step 2: Identify Causes of Colour Mismatch
- Step 3: Rectify Common Finish Durability Problems
- Step 4: Test and Verify Respray Repairs
Quick Summary
| Key Point | Explanation |
|---|---|
| 1. Assess Cabinet Conditions | Inspect cabinets for chipping, peeling, and grease to ensure proper preparation for respraying. |
| 2. Understand Colour Mismatches | Identify factors like lighting and surface variations that lead to colour discrepancies during respraying. |
| 3. Address Finish Durability | Choose specialist coatings and ensure proper surface preparation to enhance longevity and performance. |
| 4. Verify Respray Quality | Conduct thorough inspections under various lights to ensure consistency and quality of the respray finish. |
Step 1: Assess Existing Kitchen Respray Issues
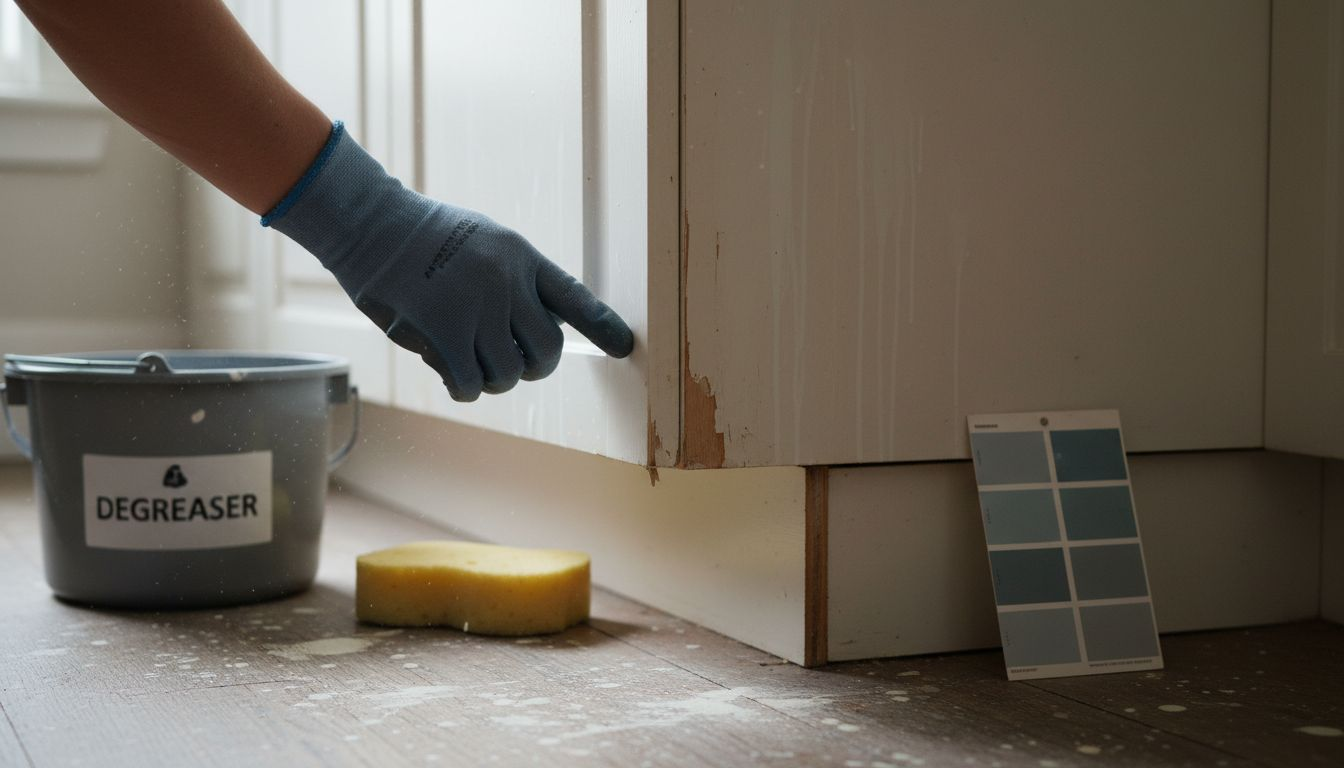
Before commencing your kitchen respray project, a thorough assessment of your existing cabinetry is essential. This initial diagnostic step helps identify potential challenges that could compromise your final colour match and finish quality. When conducting your kitchen inspection, pay close attention to the current surface condition, existing paint layers, material substrate, and signs of wear or damage.
Carefully examine each cabinet door, drawer front, and panel for multiple factors. Look for areas of chipping, peeling, previous repairs, grease residue, or uneven surfaces that might impact the respraying process. Professional kitchen renovation experts recommend obtaining a comprehensive assessment of your kitchen’s structural integrity and finish adhesion potential before proceeding with any respray work. Use strong lighting and inspect surfaces from multiple angles to capture subtle imperfections that could affect paint application.
Document your findings comprehensively by photographing problematic areas and creating a detailed inventory of surface conditions. This documentation will serve as a critical reference point for your professional respraying technician, enabling them to develop a targeted preparation strategy tailored to your specific kitchen’s requirements.
Here’s a summary of common kitchen cabinet issues and how they impact the respray process:
| Issue Type | Visual Indicators | Impact on Respray |
|---|---|---|
| Chipping & Peeling | Flaking surfaces | Poor adhesion, uneven finish |
| Grease Residue | Sticky or glossy areas | Inhibits paint bonding |
| Surface Repairs | Patchy or mismatched spots | Requires extra prep work |
| Uneven Substrate | Dips or raised areas | Results in irregular texture |
Expert Tip: Always clean surfaces thoroughly with a degreasing solution before assessment to ensure you’re seeing the true surface condition rather than masked imperfections.
Step 2: Identify Causes of Colour Mismatch
Understanding the root causes of colour mismatches is crucial for achieving a flawless kitchen respray result. Colour discrepancies can emerge from multiple complex factors, ranging from environmental conditions to technical application challenges. Recognising these potential issues early will help you prevent disappointing outcomes and ensure a professional finish.
Official colour perception testing guidelines highlight that human perception plays a significant role in colour matching accuracy. Variations in lighting conditions, substrate material, existing paint layers, and even individual colour vision can dramatically impact the final appearance. Professional technicians use specialised standardised colour assessment protocols to mitigate these potential discrepancies, ensuring precise colour reproduction across different surfaces and environments.
Key factors contributing to colour mismatch include inconsistent surface preparation, incorrect primer selection, moisture content in surfaces, previous paint layers, uneven substrate absorption, and variations in application techniques. Environmental factors such as ambient temperature, humidity, and lighting can also significantly influence colour perception and final finish. By systematically evaluating these potential variables, you can develop a comprehensive strategy to minimise colour matching challenges and achieve a seamless, professional kitchen respray.
Expert Tip: Always test colour samples under different lighting conditions and on representative surface areas to confirm true colour accuracy before full application.
Key factors influencing colour match and professional finish:
| Factor | Description | How Technicians Mitigate |
|---|---|---|
| Lighting Conditions | Differences in ambient light | Use standardised light sources |
| Primer Selection | Incorrect type or colour | Choose primer to suit substrate |
| Moisture Content | Damp surfaces affect paint | Ensure surfaces are fully dry |
| Application Method | Technique varies by area | Follow protocol for uniformity |
Step 3: Rectify Common Finish Durability Problems
Resolving durability issues in kitchen resprays requires a systematic approach to identifying and addressing potential weaknesses in your finish. Understanding the underlying causes of paint degradation is crucial for implementing effective long lasting solutions that protect your kitchen surfaces against daily wear and tear.
Kitchen renovation experts recommend selecting specialist coatings specifically designed to withstand challenging kitchen environments. These high performance finishes must account for critical factors such as humidity resistance, cleaning frequency, temperature variations, and potential mechanical stress. Pay particular attention to surface preparation, primer selection, and application techniques that enhance paint adhesion and create a robust protective layer.
Common durability problems include premature chipping, peeling, fading, and surface degradation. To address these issues comprehensively, assess the root causes such as inadequate surface cleaning, incorrect paint selection, insufficient curing time, or improper application techniques. Consider professional assessment if widespread finish failures occur, as underlying substrate conditions might require specialised intervention. Implementing a methodical repair strategy involving thorough surface preparation, compatible material selection, and precise application will significantly improve your kitchen respray’s long term performance and aesthetic quality.
Expert Tip: Allow sufficient curing time between paint layers and avoid exposing freshly resprayed surfaces to moisture or mechanical stress during the initial hardening period.
Step 4: Test and Verify Respray Repairs
Verifying the quality of your kitchen respray repairs requires a methodical and comprehensive approach to ensure optimal results. This critical step involves carefully examining every aspect of the resprayed surface to confirm that the finish meets professional standards and will withstand daily kitchen usage.
Official home repair guidelines emphasise the importance of thorough inspection and certification by competent professionals. Begin your verification process by conducting a comprehensive visual assessment under multiple lighting conditions. Check for consistency in colour, smoothness of finish, edge coverage, and any signs of uneven application or imperfections. Run your hand gently across the surface to detect subtle irregularities that might not be immediately visible.
Utilise a systematic testing approach that includes checking paint adhesion, durability, and resistance to typical kitchen stressors. Perform spot tests using mild cleaning solutions, assess colour consistency across different cabinet sections, and evaluate the finish under various environmental conditions. Pay close attention to high contact areas such as handles, edges, and surfaces near cooking zones. Document your findings with clear photographs and notes, which can serve as a reference for future maintenance or potential touch up requirements.
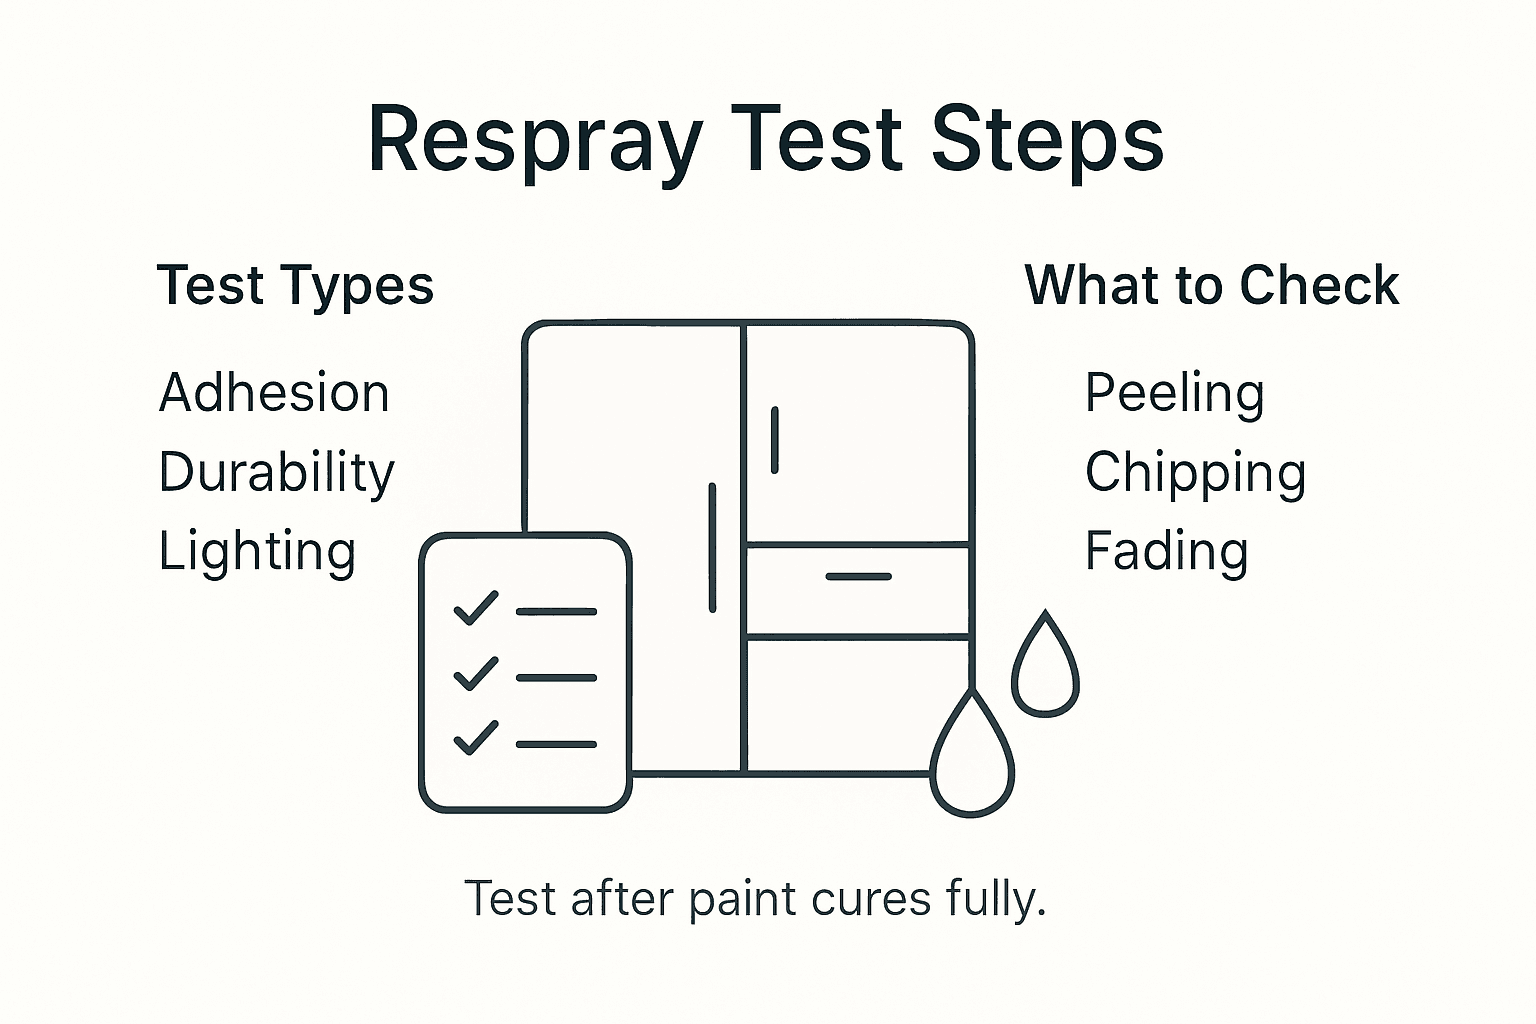
Expert Tip: Wait at least 48 hours after completing the respray before conducting detailed tests to allow the paint to fully cure and stabilise.
Achieve the Perfect Kitchen Respray Colour Match with Expert Help
Struggling with kitchen respray issues like uneven colour, poor adhesion, or unexpected finish durability problems can be frustrating and disheartening. This article highlights important challenges such as chipping, grease residue interference, and lighting conditions that affect colour match. If you want to avoid the common pitfalls of kitchen resprays and ensure a flawless, long-lasting finish, professional expertise is essential. Our skilled team specialises in in-situ kitchen resprays tailored to your unique surface conditions and aesthetic goals.

Discover how our specialists at SKR Specialists bring precision and care to every respray project. We thoroughly assess your kitchen surface, select the right primers, and apply expert techniques to deliver stunning, durable results. For a deeper insight into our approach and customer stories, explore our Uncategorized Archives. Ready to transform your kitchen confidently? Visit our main page and contact us today to schedule your expert consultation and take the first step towards a perfect kitchen respray finish.
Frequently Asked Questions
How can I assess existing kitchen cabinet issues before a respray?
Assessing existing kitchen cabinet issues involves closely inspecting surfaces for chipping, peeling, and grease residue. Document these findings with photographs and notes to guide your respraying technician and ensure thorough preparation.
What causes colour mismatches during a kitchen respray?
Colour mismatches can occur due to inconsistent surface preparation, incorrect primer selection, or environmental factors like lighting and humidity. To prevent these issues, evaluate all potential variables and conduct thorough tests on sample areas before full application.
How can I ensure durability in my kitchen respray finish?
To ensure durability, select high-performance coatings designed for kitchen environments and pay attention to surface preparation and application techniques. Allow sufficient curing time between paint layers, as this will enhance the longevity of the finish and reduce the likelihood of chipping or fading.
What steps should I take to verify my kitchen respray repairs?
Verify your kitchen respray repairs by conducting a detailed visual assessment under various lighting conditions. Test for paint adhesion and evaluate the consistency of the finish by checking high-contact areas for irregularities, documenting your findings for future reference.
How do I rectify common finish durability problems in kitchen resprays?
Rectifying finish durability problems involves identifying the root causes, such as inadequate surface cleaning or incorrect paint selection. Implement a thorough repair strategy that includes cleaning, using compatible materials, and following precise application methods to improve overall performance.
What are the best indicators of improper kitchen respray applications?
Indicators of improper applications include uneven surfaces, inconsistent colour coverage, and signs of chipping or peeling. To address these concerns, perform a tactile inspection and visual assessment while the paint is curing to determine if additional touch-ups or corrections are needed.