")
Kitchen Cabinet Cleaning Process for Spotless Results
Most british households underestimate the impact of a well-prepared kitchen when cleaning cabinets. Taking these extra steps matters because even a small oversight can lead to lingering grime, damage, or even hidden mould. In fact, studies show that thorough kitchen preparation reduces cleaning time by up to 30 percent. This guide offers reliable and practical advice so you can protect your kitchen, prevent mess, and maintain spotless cabinet spaces with confidence.
Table of Contents
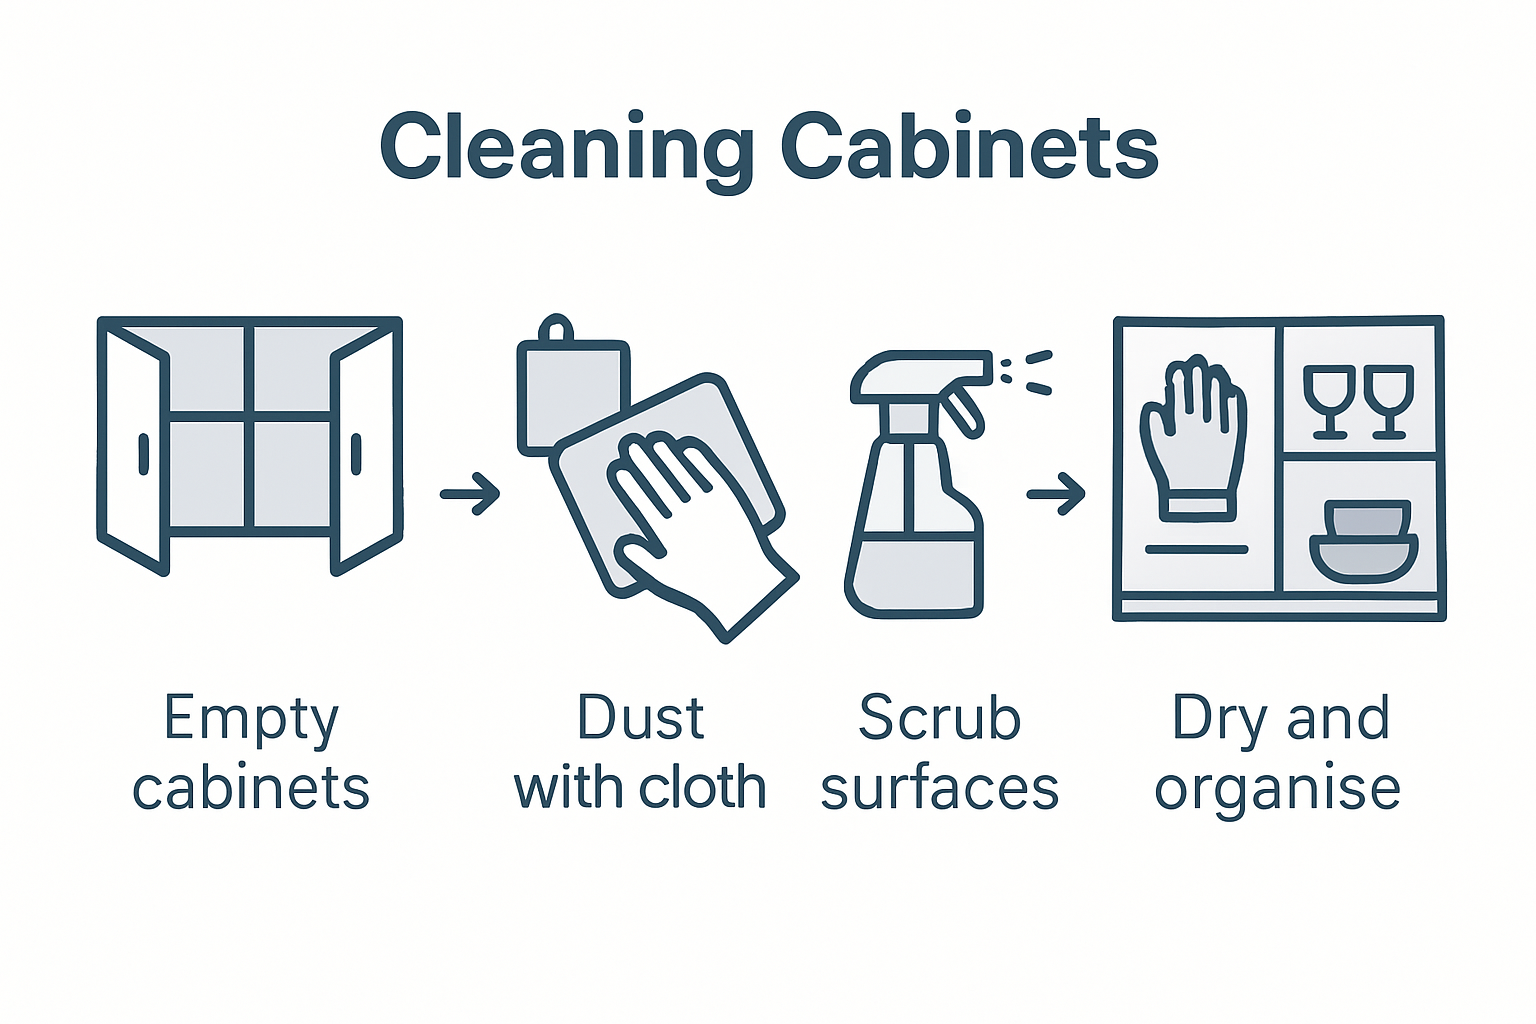
- Step 1: Prepare The Kitchen And Protect Surrounding Areas
- Step 2: Empty Cabinets And Remove Surface Dust
- Step 3: Apply Appropriate Cleaning Solutions To Cabinet Surfaces
- Step 4: Scrub Thoroughly And Wipe Down All Areas
- Step 5: Inspect Cabinets And Repeat For Stubborn Stains
- Step 6: Dry Surfaces And Restore Items To The Cabinets
Quick Summary
| Key Point | Explanation |
|---|---|
| 1. Prepare Your Kitchen Environment | Remove items and cover surfaces to prevent damage from cleaning solutions while ensuring good ventilation. |
| 2. Empty Cabinets for Efficient Cleaning | Systematically remove all items from cabinets to allow for thorough dust removal and assessment of interior conditions. |
| 3. Use Appropriate Cleaning Solutions | Select suitable cleaning products based on the cabinet material to avoid damage and ensure effective cleaning results. |
| 4. Scrub Thoroughly and Wipe Down | Use a soft brush to scrub difficult areas and microfibre cloths to wipe surfaces, ensuring no moisture remains. |
| 5. Inspect and Dry Cabinets Carefully | Examine cleaned surfaces for stubborn stains, then dry them completely before returning items to maintain hygiene. |
Step 1: Prepare the kitchen and protect surrounding areas
Preparing your kitchen for cabinet cleaning requires strategic planning and protective measures. Creating a structured cleaning approach ensures a thorough and safe process while preventing potential damage to surrounding surfaces.
Start by removing all items from countertops and adjacent surfaces. Relocate small appliances, decorative items, and food containers to a safe area away from your cleaning workspace. Cover countertops, floors, and nearby furniture with protective drop cloths or plastic sheeting to shield them from cleaning solutions and potential splashes. Use painter’s masking tape to secure coverings and create clean edges that prevent liquid seepage.
Prioritise ventilation by opening windows and ensuring good airflow through the kitchen. This helps manage cleaning chemical odours and allows surfaces to dry efficiently. Carefully consider the disposal of packaging and waste materials during your preparation to maintain a hygienic environment. Keep rubbish bags and disposal containers nearby to manage waste immediately and prevent cross-contamination.
By meticulously preparing your kitchen, you set the foundation for a successful cabinet cleaning process that protects your space and ensures optimal results.
Step 2: Empty cabinets and remove surface dust
Emptying your kitchen cabinets thoroughly and removing surface dust is a critical preparation step for achieving a pristine cleaning result. Effective cleaning requires comprehensive surface preparation to ensure no dust or debris interferes with your cabinet restoration process.
Begin by completely emptying each cabinet systematically. Remove all items including dishes, cookware, storage containers, and any loose objects. Place these items in a clean designated area away from your working space. As you remove contents, take the opportunity to sort through and discard any expired or unnecessary items. Use this moment to assess the interior cabinet conditions and identify any areas requiring special attention during cleaning.
Next, tackle dust removal using strategic techniques. Start with a soft microfibre cloth or a vacuum cleaner with a soft brush attachment to gently remove loose dust and debris from cabinet interiors and exterior surfaces. Implement a methodical cleaning approach that addresses all food contact surfaces to prevent potential contamination. Work from top to bottom to ensure dust falls downward and can be easily collected. Pay special attention to corners, hinges, and decorative mouldings where dust tends to accumulate. A clean, lint-free cloth slightly dampened with water can help capture remaining fine dust particles without risking moisture damage.
Preparing your cabinets thoroughly sets the foundation for a successful and professional-grade cleaning process.
Step 3: Apply appropriate cleaning solutions to cabinet surfaces
Selecting and applying the correct cleaning solutions is crucial for achieving spotless kitchen cabinets without causing damage. Understanding the right cleaning approach ensures effective surface treatment while protecting your cabinet materials.
Choose cleaning solutions specific to your cabinet material wood, laminate, painted or stainless steel. For wooden cabinets, use a mild pH neutral detergent mixed with warm water. Apply the solution using a soft microfibre cloth dampened slightly to prevent oversaturation. Gently wipe surfaces in circular motions, working systematically from top to bottom. Pay extra attention to areas with visible grime or grease buildup. Implement comprehensive cleaning techniques that address multiple surface types to ensure thorough sanitisation.
Avoid abrasive cleaners or harsh chemicals that might strip paint or damage delicate surface finishes. For stubborn grease or sticky residues, create a gentle solution of warm water and mild dish soap. Test any new cleaning solution on a small inconspicuous area first to ensure it does not cause discolouration or damage. Use clean microfibre cloths and change them frequently to prevent spreading dirt or grime across surfaces.
Careful application of appropriate cleaning solutions will transform your kitchen cabinets and prepare them for subsequent restoration steps.
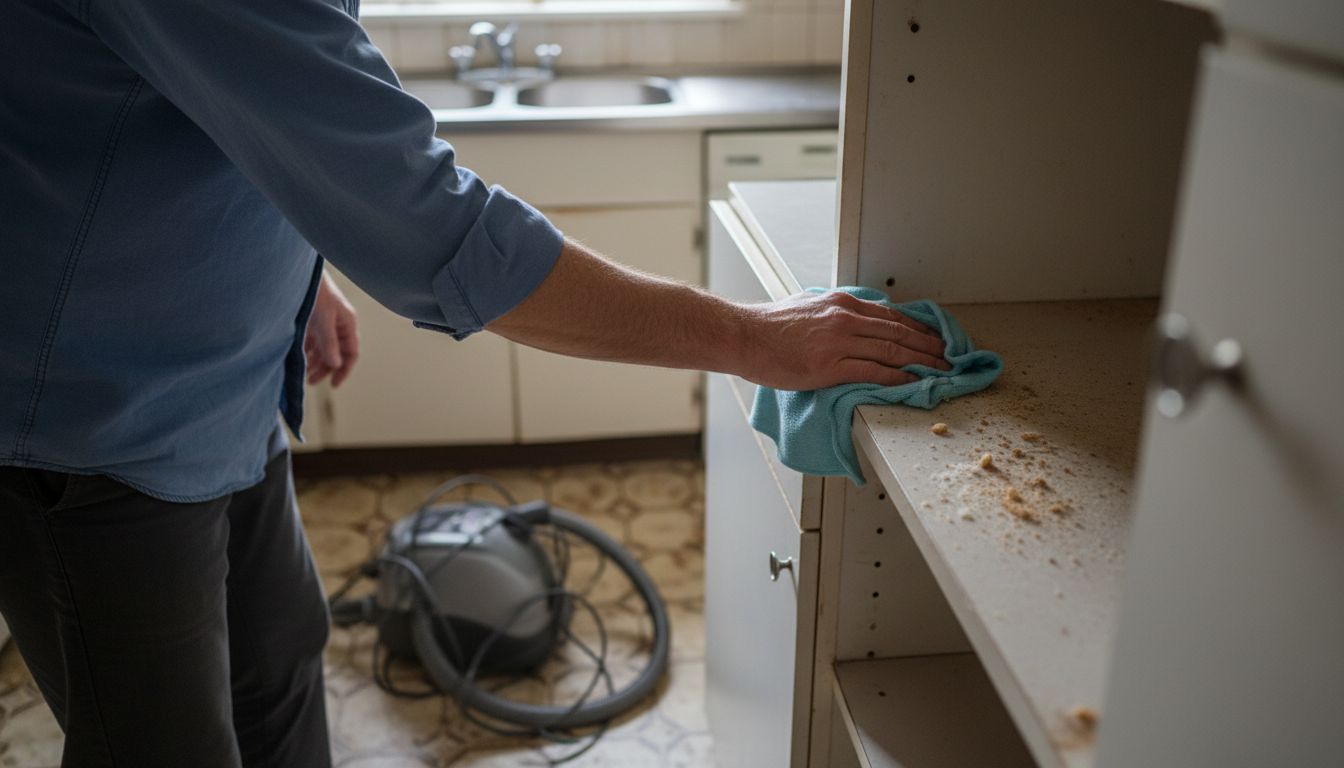
Step 4: Scrub thoroughly and wipe down all areas
Scrubbing your kitchen cabinets requires a methodical approach to ensure comprehensive cleaning and removal of accumulated grime. Effective cleaning demands systematic attention to all surface areas to prevent bacterial growth and maintain hygienic conditions.
Begin by using a soft bristled brush or non abrasive scrubbing pad to gently work cleaning solution into challenging areas. Focus on corners, edges, and decorative mouldings where dirt tends to accumulate. Use gentle circular motions to lift stubborn residues without damaging the cabinet surface. Implement thorough cleaning techniques that address potential contamination zones to ensure a comprehensive result.
After scrubbing, use clean microfibre cloths to wipe surfaces thoroughly. Work systematically from top to bottom, ensuring no cleaning solution or moisture remains on the surface. Pay extra attention to areas around handles and hinges where grime can build up unnoticed. Change your cleaning cloth frequently to prevent redistributing dirt and ensure you are using a clean surface for each wipe down.
Thorough scrubbing and meticulous wiping will transform your kitchen cabinets and prepare them for the next stage of restoration.
Step 5: Inspect cabinets and repeat for stubborn stains
Carefully inspecting your kitchen cabinets after initial cleaning is crucial to ensure a thorough and spotless result. Implementing systematic cleaning techniques helps identify and address remaining problem areas before finalising the restoration process.
Conduct a meticulous visual and tactile inspection under good lighting conditions. Run your hand gently across cleaned surfaces to detect any remaining sticky patches or hidden grime. For stubborn stains that resist initial cleaning, prepare a slightly more concentrated cleaning solution. Develop comprehensive cleaning strategies that target persistent contamination zones with precision and care.
When encountering resistant stains, apply a targeted approach. Use a soft bristled brush with gentle circular motions and allow the specialised cleaning solution to sit briefly before wiping. For extremely challenging areas, consider using a specialised degreasing agent appropriate to your cabinet material. Always test any new cleaning solution on an inconspicuous area first to prevent potential surface damage.
Thorough inspection and strategic reapplication of cleaning techniques will ensure your kitchen cabinets emerge immaculately clean and refreshed.
Step 6: Dry surfaces and restore items to the cabinets
Final stages of kitchen cabinet cleaning require careful drying and methodical replacement of items to maintain the pristine results you have achieved. Implement strategic cleaning practices that ensure complete surface preparation to protect your newly refreshed cabinet spaces.
Begin by using clean microfibre towels to thoroughly dry all cabinet surfaces. Work systematically from top to bottom, ensuring no moisture remains that could potentially cause water staining or encourage mould growth. Pat surfaces gently rather than rubbing, which can leave lint or potentially scratch delicate finishes. Develop comprehensive restoration techniques that prevent potential contamination during the replacement process.
As you return items to the cabinets, take this opportunity to reorganise and declutter. Group similar items together and consider using drawer liners or organisational containers to maintain the cleanliness you have just achieved. Wipe down each item before returning it to ensure you are not reintroducing dirt or grime to your freshly cleaned cabinet spaces.
Careful drying and thoughtful restoration will complete your kitchen cabinet transformation and maintain a hygienic cooking environment.
Transform Your Kitchen Cabinets Beyond Cleaning with Professional Respraying
Maintaining spotless kitchen cabinets through thorough cleaning is essential but can only go so far in restoring their look and durability. If you find yourself facing persistent stains, faded finishes, or damage despite careful cleaning and drying, our professional kitchen respray service offers the perfect solution to revitalise your cabinets in situ without the hassle of full replacement. This service complements the detailed cleaning process by providing a fresh, durable finish that protects and enhances your kitchen surfaces.

Discover how expert respraying can elevate the appearance of your freshly cleaned cabinets and extend their lifespan. Visit our Uncategorized Archives to learn more about our techniques and success stories. For a complete kitchen transformation, explore our full offerings at SKR Specialists. Don’t let stubborn grime or wear dull your kitchen’s heart. Take the next step today to achieve truly spotless and stunning cabinets that invite comfort and pride in your home.
Frequently Asked Questions
How should I prepare my kitchen for the cabinet cleaning process?
To prepare your kitchen for cabinet cleaning, start by removing all items from countertops and adjacent surfaces. Cover countertops and floors with protective sheeting to shield them from cleaning solutions and ensure good ventilation by opening windows.
What is the best way to remove dust from my kitchen cabinets?
To effectively remove dust from kitchen cabinets, use a soft microfibre cloth or a vacuum cleaner with a brush attachment. Begin by emptying each cabinet, then work your way from top to bottom to ensure thorough dust removal from all surfaces.
What cleaning solutions should I use on different types of cabinets?
Select cleaning solutions based on your cabinet material: use a mild pH neutral detergent for wooden cabinets and a gentle soap solution for stainless steel or laminated surfaces. Always test the cleaner on a small area before applying it across the entire surface to avoid damage.
How can I effectively scrub and wipe down my cabinets?
Use a soft-bristled brush or non-abrasive scrubbing pad to scrub the cabinets with the chosen cleaning solution. Wipe surfaces systematically from top to bottom with a clean microfibre cloth to ensure no moisture or cleaning solution is left behind.
What steps should I take to inspect and treat stubborn stains on cabinets?
Conduct a thorough inspection of your cabinets after initial cleaning to spot any remaining stains. For persistent stains, prepare a slightly stronger cleaning solution and apply it directly, using a soft-bristled brush before wiping the area clean.
How do I properly dry my cabinets after cleaning before restoring items?
To dry your cabinets thoroughly, use clean microfibre towels and gently pat all surfaces, ensuring no moisture remains. Organise and wipe down each item before returning it to the cabinets to prevent reintroducing dirt or grime.
Recommended
- Kitchen Cabinet Refinishing Guide for Flawless Results – WordPress
- Kitchen Cabinet Prepping Guide for Flawless Respraying – WordPress
- Kitchen Cabinet Touch Up Process for Flawless Results – WordPress
- 7 Essential Stages of Kitchen Respraying Explained Simply – WordPress
- Kitchen is Ready for Her Reveal! | Shutter World
- Jak urządzić małą kuchnię — praktyczny poradnik krok po kroku – Emmi Kuchnie – meble kuchenne na wymiar, szafy komandor, kuchnie bydgoszcz, meble na wymiar bydgoszcz, stolarz bydgoszcz