")
Kitchen Cabinet Refinishing Guide for Flawless Results
Nearly 85 percent of homeowners say a refreshed kitchen boosts their home’s value and livability. Tackling a cabinet refinishing project may seem daunting, but the right approach can dramatically update your space without the cost of a full remodel. With step-by-step guidance, you’ll learn how to prepare, paint, and reassemble your kitchen cabinets for a stunning, long-lasting result.
Table of Contents
- Step 1: Assess and Clear Kitchen Cabinets
- Step 2: Clean and Sand Surfaces Thoroughly
- Step 3: Mask Off and Protect Surroundings
- Step 4: Apply Primer for Lasting Adhesion
- Step 5: Respray Cabinets with Chosen Finish
- Step 6: Inspect and Reassemble Cabinets
Quick Summary
| Key Point | Explanation |
|---|---|
| 1. Remove Hardware Systematically | Take careful steps to remove and number each cabinet door and hardware to ensure easy reassembly. |
| 2. Thoroughly Clean and Sand Surfaces | Clean cabinets with a degreaser and sand lightly to create a smooth surface for painting. |
| 3. Use Proper Masking Techniques | Protect surrounding areas with masking tape and drop cloths to avoid paint splatters during the project. |
| 4. Apply a Suitable Primer | Choose the right primer for your surface to ensure excellent paint adhesion and durability. |
| 5. Inspect and Reassemble Carefully | Reattach hardware and doors methodically, checking alignment to ensure functionality and a professional finish. |
Step 1: Assess and Clear Kitchen Cabinets
Getting your kitchen cabinets prepped for refinishing requires careful initial assessment and strategic clearing. You will need to systematically remove all hardware and track each component to ensure a smooth renovation process.
According to NRLA, the first critical step is removing handles from each kitchen cabinet and carefully numbering each door. This helps guarantee correct reassembly after refinishing. As recommended by DIY Doctor, store all handles and hinges in a designated safe container to prevent losing any small parts during the renovation.
Before starting, gather your essential tools: a screwdriver set, marker or labels, small storage container, and a clean workspace. Remove doors methodically one by one, placing them on a protected surface. Number each door and its corresponding cabinet location using painter’s tape or a marker to maintain precise tracking. This approach prevents confusion during reinstallation and ensures each cabinet component returns to its original position.
Warning: Take your time during this process. Rushing can lead to misplaced hardware or accidental damage to your cabinet surfaces. Patience here sets the foundation for a professional refinishing result.
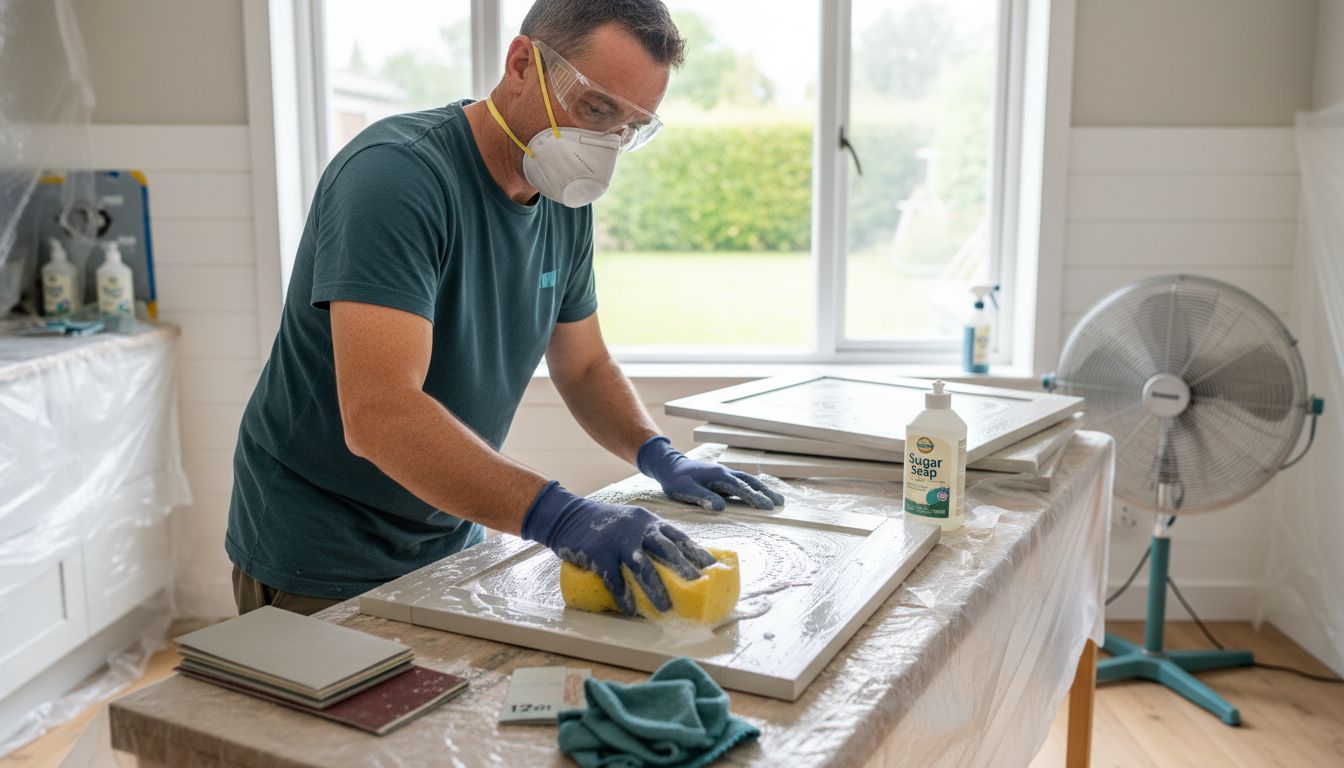
Step 2: Clean and Sand Surfaces Thoroughly
After removing cabinet doors and hardware, you are now ready to prepare the surfaces for a flawless refinishing project. This stage involves thorough cleaning and strategic sanding to create the perfect foundation for your new finish.
According to DIY Doctor, the process begins with a comprehensive cleaning using a multi-purpose cleaner or degreaser, followed by sugar soap to eliminate any lingering residue. As recommended by NRLA, apply sugar soap with a sponge to remove grease effectively from the cabinet doors.
Once cleaned, you will need to sand the surfaces lightly. Use high-grit sandpaper between 100 and 120 grit to smooth out imperfections and create a surface that allows new paint to adhere properly. Work methodically across each cabinet door and frame, using gentle circular motions. After sanding, use a clean dust cloth to wipe away any remaining dust particles.
Warning: Always wear protective eyewear and a dust mask during sanding to protect yourself from fine particles. Take your time and maintain consistent pressure to avoid creating uneven surfaces that could impact your final finish.
Step 3: Mask Off and Protect Surroundings
Before you start painting your kitchen cabinets, protecting your workspace is crucial to achieving a professional finish. This step involves carefully preparing your area to prevent unwanted paint splashes and maintain a clean work environment.
As recommended by DIY Doctor, use masking tape strategically to protect areas you do not want to paint. Following guidance from NRLA, place your cabinet doors onto planks secured with screws to create a stable painting surface.
Begin by covering your countertops, floors, and nearby appliances with plastic sheeting or drop cloths. Use painter’s tape to secure the edges and create a barrier against potential paint drips. When masking off areas, press the tape firmly to ensure a tight seal and prevent paint from seeping underneath. Pay special attention to walls, backsplashes, and any hardware or fixtures that cannot be removed.
Pro tip: Work in a well-ventilated area and consider using newspaper or cardboard to create additional protective barriers. This extra precaution will save you hours of cleanup and help you maintain a pristine kitchen during your refinishing project.
Step 4: Apply Primer for Lasting Adhesion
Priming is a critical step that transforms your cabinet refinishing project from amateur to professional. This stage creates the perfect foundation for your final paint colour and ensures maximum paint durability.
According to DIY Doctor, selecting the right primer is essential. For wooden surfaces, use a dedicated timber primer, while laminated surfaces require a specialist melamine primer. As NRLA recommends, applying a suitable primer will guarantee lasting adhesion of your topcoat.
Start by using a foam roller or high-quality synthetic brush to apply an even layer of primer. Work in long, smooth strokes following the wood grain to prevent visible brush marks. Apply the primer in thin, consistent coats and allow sufficient drying time between applications. Pay extra attention to edges and corners, ensuring complete coverage without pooling or dripping.
Warning: Always work in a well-ventilated space and wear protective gloves and a mask. Allow each primer coat to dry completely before applying the next layer, typically waiting around two to four hours between coats depending on the manufacturer’s instructions.
![]()
Step 5: Respray Cabinets with Chosen Finish
With your cabinets primed and prepared, you are now ready to transform them with your chosen paint finish. This stage is where your kitchen renovation truly comes to life, turning ordinary cabinets into a stunning focal point.
According to DIY Doctor, after your undercoat has fully dried, lightly sand the surface to smooth out any imperfections and remove all dust. Apply at least two thin layers of topcoat, allowing each coat to dry completely before applying the next. As NRLA recommends, ensure you leave the doors to dry for at least 12 hours between recoats.
When applying your chosen finish, use a high-quality foam roller or spray gun for an even, professional application. Work in consistent, overlapping strokes following the wood grain. Hold your tool at a steady distance to prevent drips or uneven coverage. For intricate areas or detailed sections, switch to a precision brush to maintain a smooth finish.
Pro tip: When using kitchen paint finish techniques, choose a finish that complements your kitchen’s lighting and style. Lighter colours can make a small kitchen feel more spacious, while darker tones add depth and sophistication.
Step 6: Inspect and Reassemble Cabinets
With your freshly painted cabinets now fully dried, the final stage of your kitchen transformation involves carefully reassembling and inspecting each component. This crucial step ensures your refinishing project looks professional and functions perfectly.
According to NRLA, after the paint has dried, reattach the handles and hinges to each door, ensuring they are securely fastened. DIY Doctor recommends carefully realigning all components to guarantee proper cabinet functionality.
Begin by laying out all hardware and matching each piece to its original location. Check that hinges are clean and functioning smoothly. Carefully attach handles and hinges, making sure they are level and tightly secured. When reinstalling doors, work slowly and check alignment multiple times to prevent unnecessary stress on your newly painted surfaces.
Pro tip: If you followed our kitchen cabinet touch up process, your cabinets should now look pristine. Take a moment to step back and admire your transformed kitchen space, appreciating the professional finish you have achieved through careful preparation and execution.
Achieve Flawless Kitchen Cabinet Refinishing Without the Stress
Refinishing your kitchen cabinets can feel overwhelming with all the steps involved from removing hardware to applying primer and repainting. Common challenges include tracking cabinet doors and handles, preventing paint drips, and achieving a professional finish that lasts. If these sound familiar, you are not alone in wanting a stress-free transformation that refreshes your kitchen beautifully.

Discover expert help with our professional kitchen respray service where we respray kitchens in-situ, eliminating the hassle of removal and reassembly. Visit our Uncategorized Archives to explore insights and tips tailored to your needs. Ready for flawless results? Contact us today at SKR Specialists and transform your kitchen cabinets with confidence and ease.
Frequently Asked Questions
How do I prepare my kitchen cabinets for refinishing?
To prepare your kitchen cabinets for refinishing, you should start by removing all hardware and labeling each door and its corresponding cabinet location. Systematically clear the cabinets while keeping all components organized to ensure a smooth reassembly after refinishing.
What cleaning method do I need before sanding my cabinets?
Before sanding, thoroughly clean the cabinet surfaces using a multi-purpose cleaner followed by sugar soap. This will remove grease and residue, ensuring the surfaces are ready for sanding and paint application.
What type of primer should I use for kitchen cabinet refinishing?
For kitchen cabinet refinishing, use a dedicated timber primer for wooden surfaces and a specialist melamine primer for laminated surfaces. Apply an even layer of primer in thin coats, allowing full drying time before proceeding with the topcoat.
How many coats of finish should I apply after priming?
It’s recommended to apply at least two thin layers of topcoat after priming your kitchen cabinets. Allow each coat to dry completely, typically for 12 hours, before applying the next layer to achieve a smooth and durable finish.
How do I reassemble my cabinets after refinishing?
When reassembling your cabinets, lay out all hardware and carefully match each piece to its original location. Securely fasten hinges and handles, and check alignment multiple times to ensure proper functionality without stressing the newly painted surfaces.
What precautions should I take while sanding and painting?
Always wear protective eyewear and a dust mask while sanding and painting to safeguard yourself from fine dust and fumes. Maintain a well-ventilated workspace, and take your time to ensure even surfaces and professional-quality results.