
How to Prepare Your Kitchen for Professional Spraying: The Ultimate 2026 Checklist
What if the secret to a kitchen that looks brand new for the next ten years has almost nothing to do with the paint itself? Most homeowners assume a transformation begins with the first coat, yet true specialists know that a factory-grade result is engineered long before the spray gun is even connected. Mastering how to prepare kitchen for spraying is the vital difference between a surface that fails and a durable finish that withstands the rigours of a busy home.
It is natural to worry about overspray or whether a new colour will truly bond to greasy surfaces near the cooker. We understand these concerns because we approach every kitchen unit respray with the precision of an expert craftsman. This guide provides a clear checklist to help you organise your space and understand our professional degreasing and masking protocols. You will gain total confidence in a process that converts domestic surfaces into high-performance substrates; this ensures your kitchen achieves the perfect 10/10 satisfaction score that modern homeowners demand in 2026. By following these steps, you can secure the 113% return on investment that a minor kitchen remodel offers without the disruption of a full replacement.
Key Takeaways
- Understand the ’70/30 Rule’ and why professional preparation is a multi-stage engineering process rather than just a simple cleaning task.
- Discover exactly how to prepare kitchen for spraying by identifying which items to remove from worktops and when it’s necessary to empty your cabinet interiors.
- Learn about the industrial degreasing and ‘Double-Clean’ methods that strip away years of residue to create a perfectly neutral base for the paint.
- See how we create a sealed ‘bubble’ environment using advanced masking and draping to protect your floors, appliances, and the rest of your home.
- Recognise the importance of the specialist’s final walkthrough and the application of high-build primers in achieving a flawless, factory-grade finish.
The Science of Surface Preparation: Why 70% of the Work Happens Before Spraying
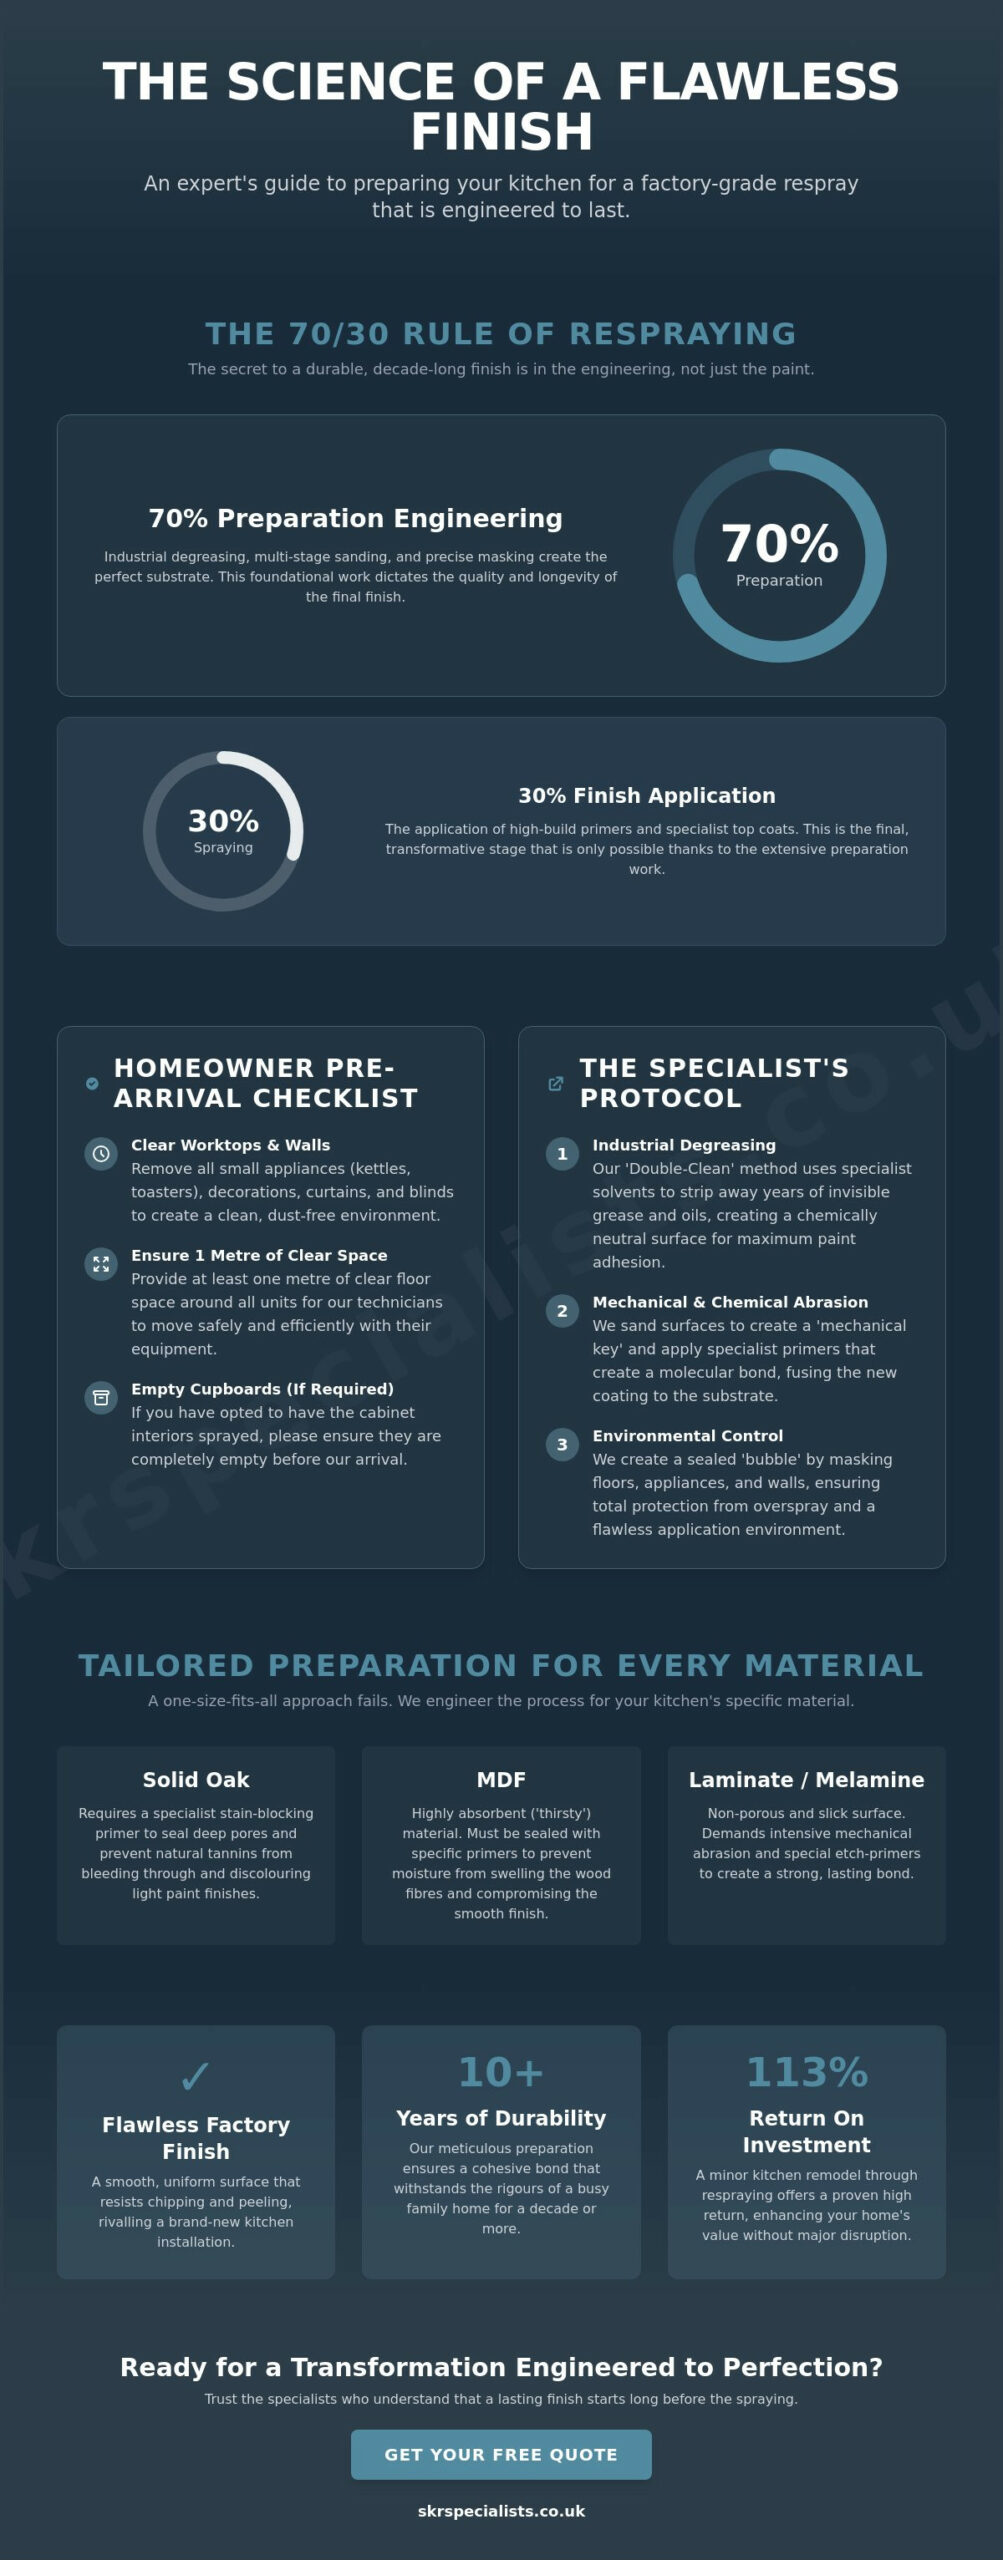
Professional spraying is an additive process. It builds upon the existing surface, which means the final result is only as stable as the base beneath it. Most homeowners view preparation as a quick wipe-down, but industry specialists operate on the 70/30 Rule. This principle dictates that 70% of the project time is spent engineering the substrate, whilst the actual application of colour takes up only the final 30%. If you skip the technical groundwork, even the most expensive coatings will eventually fail. Understanding how to prepare kitchen for spraying requires a shift in perspective from domestic tidying to industrial surface engineering.
The primary enemy of a factory-grade finish is invisible. Cooking grease, hand oils, and aerosolised fats from frying create a microscopic barrier on cabinet doors. Whilst a surface might look clean to the naked eye, it often lacks the chemical neutrality required for modern coatings to bond. There is a vast difference between domestic cleanliness and being chemically clean. We use specialist solvents to strip away these contaminants, ensuring the surface is entirely inert. Whether is kitchen cabinet spraying durable depends entirely on this initial phase. Without removing these oils, the paint sits on top of the grease rather than becoming part of the unit.
Adhesion vs. Cohesion: Understanding the Bond
To achieve a finish that lasts a decade, we focus on two types of bonding. Mechanical adhesion occurs when we sand the surface to create ‘teeth’ for the paint to grip. Chemical adhesion happens at a molecular level through the use of a high-performance preparatory coating. This specialist primer is designed to bite into the substrate, creating a bridge between the old material and the new finish. By managing the surface energy of the unit, we ensure the paint doesn’t just sit on the surface but actually fuses with it. This creates a cohesive structure that resists chipping and peeling in high-traffic areas.
Substrate Variations: Wood, MDF, and Laminate
Every material behaves differently under a spray gun. Solid oak has deep pores and natural tannins that can bleed through light colours if not sealed with a stain-blocker. In contrast, modern MDF is incredibly thirsty. It acts like a sponge, soaking up moisture and causing the wood fibres to swell if the wrong products are used. Laminate and melamine surfaces present the opposite challenge; they are non-porous and ‘slick’, meaning they require intensive mechanical abrasion and specific etch-primers to ensure a bond. A one-size-fits-all approach is the hallmark of general trade labour, whereas a specialist tailors the preparation to the specific material of your kitchen units.
Homeowner Pre-Arrival Checklist: Organising Your Space for Transformation
A professional respray is a partnership between the homeowner and the specialist craftsman. Whilst we bring the technical precision, your preparation ensures the environment is primed for a factory-grade result. Knowing how to prepare kitchen for spraying involves more than just a quick tidy; it’s about creating a clear, uncontaminated workspace where our technicians can move with speed and accuracy. By following this checklist, you remove the logistical friction that can slow down a high-precision project.
Clearing the Worktops and Walls
Every item left in the kitchen is a potential surface for dust collection. Start by removing all small appliances, including kettles, toasters, and coffee machines, and relocate them to a temporary station. This isn’t just about protecting your gadgets; it’s about ensuring our masking tapes have a clear, flat surface to adhere to. Take down curtains, blinds, and wall decorations. These fabric items trap airborne particles that can settle on wet paint. We also require at least 1 metre of clear floor space around all units. Our specialists need room to navigate with equipment without the risk of tripping or bumping into furniture, which could compromise the final finish.
The Internal Cupboard Debate
One of the most frequent questions we receive is whether you need to empty every cabinet. If you’ve opted for a standard kitchen unit respray where only the external fronts and edges are treated, you can usually leave the contents inside. However, if we’re spraying the visible ‘carcass’ edges or the inside of the doors, the interiors must be completely clear. Even when interiors remain closed, fine sanding dust has a way of finding gaps. We recommend sealing food and crockery in plastic bins or moving them to another room. Following EPA lead-safe practices for dust containment is a standard we respect, ensuring your living environment remains healthy throughout the process.
Organising a temporary kitchen elsewhere in the house is a savvy move. You won’t have access to your cupboards or cooker whilst the ‘bubble’ is in place. If you’re ready to see the transformative power of a professional finish, you can request a tailored quote to begin your project planning.
Logistics and safety are the final pieces of the puzzle. Ensure there is a clear parking space for our team’s van as close to the entrance as possible; we carry heavy, specialised equipment that requires frequent access. Finally, please arrange for pets to be kept in a separate part of the house. Our technicians move quickly, and the presence of ‘four-legged residents’ in the spray zone is a safety risk for both the animals and the project’s integrity. A 48-hour countdown should include a final check of these points, ensuring a seamless start on the day of arrival.
The Professional Degreasing and Sanding Protocol
Once the initial homeowner tasks are complete, our technicians begin the most critical phase of the transformation. Learning how to prepare kitchen for spraying at a professional level means moving far beyond a simple bucket of soapy water. We employ an industrial degreasing protocol that uses specialised solvents to strip away decades of accumulated fats and aerosolised oils. This isn’t a cursory wipe; we use a “Double-Clean” method. The first pass removes the bulk of the surface contaminants, whilst the second pass ensures the substrate is entirely neutralised and free from any remaining residue that could compromise the finish.
We combine this chemical cleaning with high-precision abrasive preparation. Selecting the correct grit is a delicate balance; we need to create a “key” that allows the paint to grip without damaging the profile of the door. Our team uses dustless sanding technology equipped with HEPA filtration. This system extracts particles at the point of contact, ensuring your home remains clean whilst we prepare the surfaces. This modern approach is what separates a specialist respray from standard domestic decorating, providing a cleaner environment and a more consistent bond.
Chemical Stripping and Neutralisation
Domestic products like sugar soap are often insufficient for the high-end industrial coatings we apply. Many kitchens have a build-up of silicone from cleaning sprays or wax from furniture polishes, both of which act as a repellent to new paint. We adhere to rigorous SSPC/NACE surface preparation standards to ensure every millimetre of the substrate is chemically ready for coating. Our solvents are specifically chosen to neutralise these stubborn contaminants, leaving a surface that is truly “chemically clean.” This prevents the “fish-eye” defects and peeling that occur when paint reacts with hidden residues.
Precision Sanding and Repair
Preparation also involves restoring the integrity of the kitchen units. We meticulously inspect every panel for minor dents, scratches, or “blown” edges where moisture has caused the MDF to swell. These imperfections are filled with high-strength two-pack fillers and sanded flush. Intricate mouldings and the deep grooves of Shaker-style doors are sanded by hand to ensure total coverage. Before a single drop of primer is sprayed, we perform a final “tack-ragging.” This involves using a specialised sticky cloth to pick up every microscopic dust particle. It’s this level of detail that ensures the final result is a flawless, factory-grade finish that looks as though it has just left the showroom.
Masking, Draping, and Environmental Control
The final stage of preparation involves creating what we call the ‘bubble’. This is a meticulously sealed environment that isolates the kitchen units from the rest of your home. Whilst previous sections focused on the substrate, this phase is about environmental engineering. Understanding how to prepare kitchen for spraying requires an appreciation for the containment of aerosolised particles. We don’t just throw down plastic sheets; we build professional-grade barriers using heavy-duty, antistatic materials that prevent overspray travel. This ensures that the transformative process remains confined strictly to the intended surfaces.
We avoid standard masking tapes found in local DIY shops. These often bleed or leave adhesive residue that can ruin the very surfaces you are trying to protect. Instead, we utilise low-tack, high-precision tapes that create a razor-sharp ‘taping line’. This technique ensures a clean break between your newly sprayed units and the fixed elements of your kitchen. It’s this level of detail that separates a specialist respray from general domestic decorating.
Floor and Appliance Protection
We treat your floors with the same respect as your cabinets. We use antistatic, heavy-duty floor protection that stays flat and doesn’t tear underfoot. This is far superior to thin plastic sheets that can create trip hazards or shift during the project. We also take great care to seal ovens, hobs, and extractors. These are wrapped in specialist films to prevent any fine mist from entering cooling vents or settling on sensitive glass surfaces. This meticulous masking is the only way to guarantee that the only thing receiving a new colour is the cabinetry itself.
Atmospheric Control
A factory-quality finish relies on more than just the spray gun; it depends on the air around it. We monitor temperature and humidity levels throughout the day to ensure the coating cures at the correct rate. If the air is too damp or too cold, the paint won’t level correctly, leading to a textured ‘orange peel’ effect. We also manage airflow using portable extraction units. These machines pull airborne overspray out of the ‘bubble’, keeping the workspace clear and preventing dust from settling on the wet finish.
Drafts are another silent threat to a flawless result. Even a slight breeze from an improperly sealed door can introduce contaminants into the wet paint. We seal all entry points and manage ventilation through controlled extraction. This level of environmental control is a hallmark of the expert craftsman. If you are ready to transform your space with this level of precision, book your kitchen unit respray with our specialist team today.
Final Inspection: Moving from Preparation to the High-End Finish
The transition from a masked ‘bubble’ to the first application of colour is the most rewarding phase of the project. Precision is everything at this stage. After hours of engineering the substrate, we perform a final walkthrough with a ‘Specialist’s Eye’. This is a meticulous hunt for missed residues or tiny imperfections in the masking lines. Mastering how to prepare kitchen for spraying culminates here; the quality of the finish is directly proportional to the discipline of the final inspection. We don’t rush the start of the spray because the primer never lies about the quality of the prep work.
We begin by applying a high-build primer. This isn’t just a base coat; it is the first visual confirmation of perfect prep. The primer acts as a diagnostic tool, highlighting any grain patterns or microscopic dents that were invisible on the raw surface. True kitchen respray specialists uk never skip the mid-coat de-nibbing process. This involves a light, fine-grit sand between coats to remove ‘raised grain’ or any stubborn airborne micro-dust. This ensures the subsequent topcoats lay perfectly flat, resulting in that coveted factory-grade aesthetic that resists the wear and tear of a modern home.
The Primer Inspection
We use high-intensity lighting to scrutinise the primed surface from every angle. Shadows revealed by these lights guide our technicians in applying micro-fillers to any remaining pits or scratches. This level of refinement is what creates a mirror-smooth result. We don’t move to the final colour until we are certain the primer has chemically bonded with the unit. This bond is the foundation of longevity; it ensures your kitchen remains resistant to the heat and steam of daily cooking whilst maintaining its vibrant aesthetic for years to come.
Your Role During the Spray
Once the final prep is complete and the spray gun is active, the kitchen remains strictly ‘out of bounds’. Even the smallest movement near the ‘bubble’ can stir up dust or disrupt the atmospheric control we have established. Understanding how to prepare kitchen for spraying also means planning for the curing timeline. Whilst our coatings are touch-dry quickly, they require a specific window to reach full chemical hardness. We will advise you exactly when it’s safe to re-enter and begin using your transformed space. If you’re ready to move from planning to action, you can Get a kitchen respray quote to start your project today. Meticulous preparation is the only path to a finish that looks, feels, and lasts like a brand-new kitchen.
Step into Your Transformed Kitchen
Engineering a factory-quality finish is a meticulous journey that begins long before we trigger the spray gun. You now understand that mastering how to prepare kitchen for spraying involves a synergy between homeowner organisation and our industrial degreasing protocols. By creating a controlled environment and respecting the science of substrate adhesion, you ensure a result that is as durable as it is beautiful.
Our specialist technicians bring automotive-grade precision to every project, delivering durable finishes that consistently outperform traditional hand-painting. We provide national UK coverage with a mess-free guarantee; this ensures your home remains pristine whilst we execute the transformation. There’s no need for the cost or chaos of a total replacement when a superior restoration is within reach.
Transform your kitchen with a professional respray; get your instant quote here and start your journey toward a stunning, high-end finish today. Your kitchen’s renewal is just a few steps away.
Frequently Asked Questions
Do I need to take the doors off the hinges before the sprayers arrive?
You don’t need to remove the doors or drawers yourself. Our specialist technicians handle all dismantling as part of the professional service. This ensures that hinges and hardware are organised correctly for reinstallation. We typically remove the doors to treat them in a controlled environment whilst the fixed carcasses are prepared and sprayed on-site for a seamless result.
How long does the preparation stage usually take for an average kitchen?
The preparation phase usually takes between one and two days for a standard-sized kitchen. This timeline accounts for the intensive degreasing, precision sanding, and masking required to create the ‘bubble’ environment. Larger or more complex kitchens with intricate mouldings may require additional time to ensure every surface is chemically clean and ready for the first preparatory coating.
Will there be a lot of dust in my house during the sanding process?
There won’t be significant dust in your home because we utilise advanced dustless sanding technology. These systems extract particles at the point of contact, preventing them from becoming airborne and settling in other rooms. This is a primary reason why homeowners choose professional specialists over general trade labour; it maintains a clean, healthy living environment throughout the restoration process.
Can you spray over existing paint or do I need to strip it first?
We can spray over existing paint as long as the original coating is stable and well-bonded to the substrate. Our process involves a ‘Double-Clean’ and precision sanding to create a mechanical key for the new primer. If the previous paint is peeling or failing, we’ll address those specific areas during the repair stage to ensure the new finish is built on a solid foundation.
Do I need to empty all my kitchen cupboards completely?
You only need to empty your cupboards completely if we’re spraying the internal edges or the ‘carcass’ of the units. For a standard external respray, you can usually leave items inside, although we recommend sealing food in plastic containers. Knowing how to prepare kitchen for spraying involves deciding whether you want the interiors treated, as this dictates the level of clearing required before we arrive.
What happens if my kitchen units have water damage or peeling laminate?
We repair minor water damage and peeling laminate as part of our meticulous preparation protocol. Swollen MDF is sanded back and treated with high-strength fillers, whilst loose laminate is professionally rebonded. These repairs are essential for achieving a mirror-smooth result that lasts, as the final coating cannot hide structural defects or moisture damage in the underlying substrate.
How do you protect my floor and worktops from the spray paint?
We protect your worktops and floors using professional-grade, antistatic barriers and low-tack precision tapes. Unlike standard DIY materials, these specialist covers won’t shift or leave sticky residues on your surfaces. We create a completely sealed environment that isolates your fixed elements, ensuring that the only items receiving a new colour are the kitchen units themselves.
Can I stay in the house whilst the kitchen is being prepared and sprayed?
You can stay in your home during the project, but the kitchen area will be strictly ‘out of bounds’ once the spray zone is established. This prevents airborne contaminants from entering the wet finish and ensures your safety. Many homeowners find it helpful to plan how to prepare kitchen for spraying by setting up a temporary tea and coffee station in a different room for the duration of the project.