")
Paint Curing: Why It Matters for Kitchen Resprays
Every kitchen in England faces the unrelenting combination of steam, grease, and temperature swings from daily cooking routines. For homeowners planning a respray, understanding the difference between drying and true paint curing can mean the difference between a finish that peels in months and one that lasts for years. Proper paint curing turns a fresh coat into a durable shield, protecting your kitchen from moisture, contaminants, and demanding conditions unique to this space. This guide explains why patience during paint curing is your best investment for a kitchen that stays beautiful and resilient.
Table of Contents
- What Paint Curing Means For Kitchens
- Types Of Curing: Air, Catalysed, And UV
- Differences Between Drying And Curing
- Factors Affecting Curing In Real Homes
- Mistakes That Compromise Paint Durability
Key Takeaways
| Point | Details |
|---|---|
| Understanding Curing vs. Drying | Curing is a chemical process that fully hardens paint and develops its protective qualities, which is essential for kitchen durability. Drying is merely the surface appearance; assuming readiness based on dryness can lead to respray failure. |
| Importance of Ventilation | Adequate airflow is crucial during the curing process to allow solvents to escape and prevent moisture-related defects. Keep windows open and run extraction fans for at least 48 hours post-respray. |
| Curing Duration Needs Patience | Full curing can take several weeks, depending on the paint type and kitchen conditions; normal use should be avoided until complete. Rushing back to typical activities can compromise the finish. |
| Surface Preparation is Key | Comprehensive surface cleaning and preparation are vital for proper paint adhesion. Poor preparation can result in peeling or bubbling, undermining the longevity of the new paint job. |
What Paint Curing Means for Kitchens
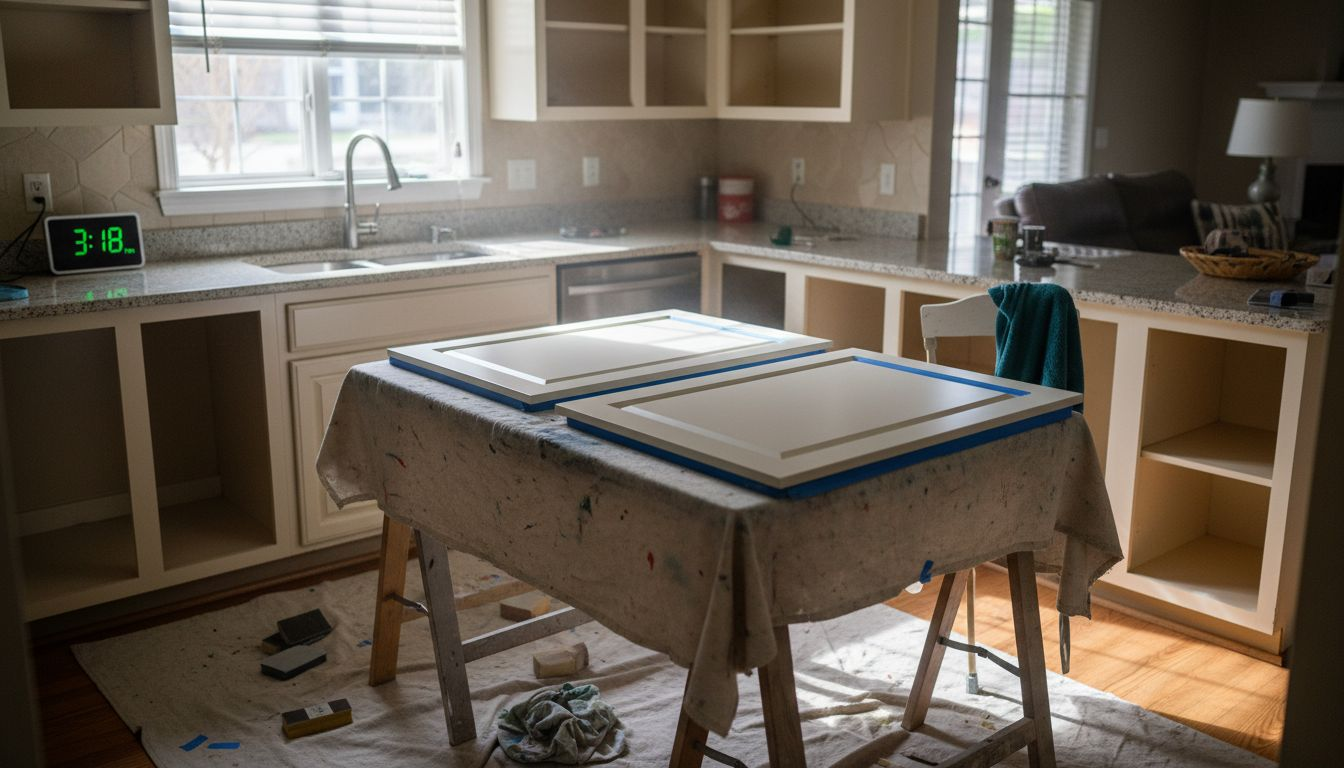
Paint curing in your kitchen is fundamentally different from the drying you might notice on the surface. When a painter tells you the paint has dried, that’s just the beginning. True curing is the chemical process where paint fully hardens and develops its protective qualities. Think of it like concrete setting after pouring. The surface might feel dry to touch within hours, but the material continues to strengthen for days or weeks. In kitchen environments, this distinction matters enormously because your cabinets face relentless challenges. Steam rises from boiling pots, grease splatters during cooking, and humidity fluctuates constantly throughout the day. A paint layer that has merely dried will eventually fail under these pressures. A properly cured finish becomes a tough, resilient shield that resists the very conditions that would damage uncured or partially cured paint.
What makes curing particularly critical in kitchens is how the environment attacks paint from multiple angles simultaneously. The resistance to moisture and contaminants your paint develops during curing directly determines how long your respray will last. Steam condenses on cabinet doors, creating persistent damp conditions. Cooking oils become airborne and settle as a thin, greasy film. Temperature swings as you use your oven and then open windows create stress on the paint layer. Each of these factors would compromise a surface that has only dried rather than fully cured. Proper curing ensures the paint bonds securely to the underlying cabinet material and develops sufficient hardness to withstand these kitchen-specific pressures. Ventilation plays a crucial role here. Your kitchen needs adequate airflow during and after the respray process to allow solvents to escape properly. Without proper ventilation, curing slows dramatically, leaving paint vulnerable to damage from the very kitchen activities you want it to protect against.
The practical implication for you as a homeowner is timing. During the curing period, your kitchen is not yet ready for normal use. Painted cabinets that appear dry might develop marks, dents, or discoloration if touched or exposed to steam too early. This is when many resprays fail not because of poor workmanship, but because people resume normal kitchen activities before curing completes. Your newly sprayed kitchen needs protection and patience. The exact curing timeframe depends on paint type and kitchen conditions, but full chemical hardness typically requires several weeks. That means careful use of the space, avoiding steam exposure from cooking, and maintaining good ventilation. Kitchens exposed to intense activity and varying conditions such as heat and moisture particularly benefit from respecting the full curing timeline. Once curing is complete, your paint finish will maintain its aesthetic appearance and physical integrity even under the demanding environmental stresses found in active kitchen spaces.
Pro tip: Keep your kitchen well ventilated with windows open or extraction fans running for at least 48 hours after respray completion, and delay using your oven or running hot water for at least one week to allow the paint to cure fully without early exposure to steam.
Types of Curing: Air, Catalysed, and UV
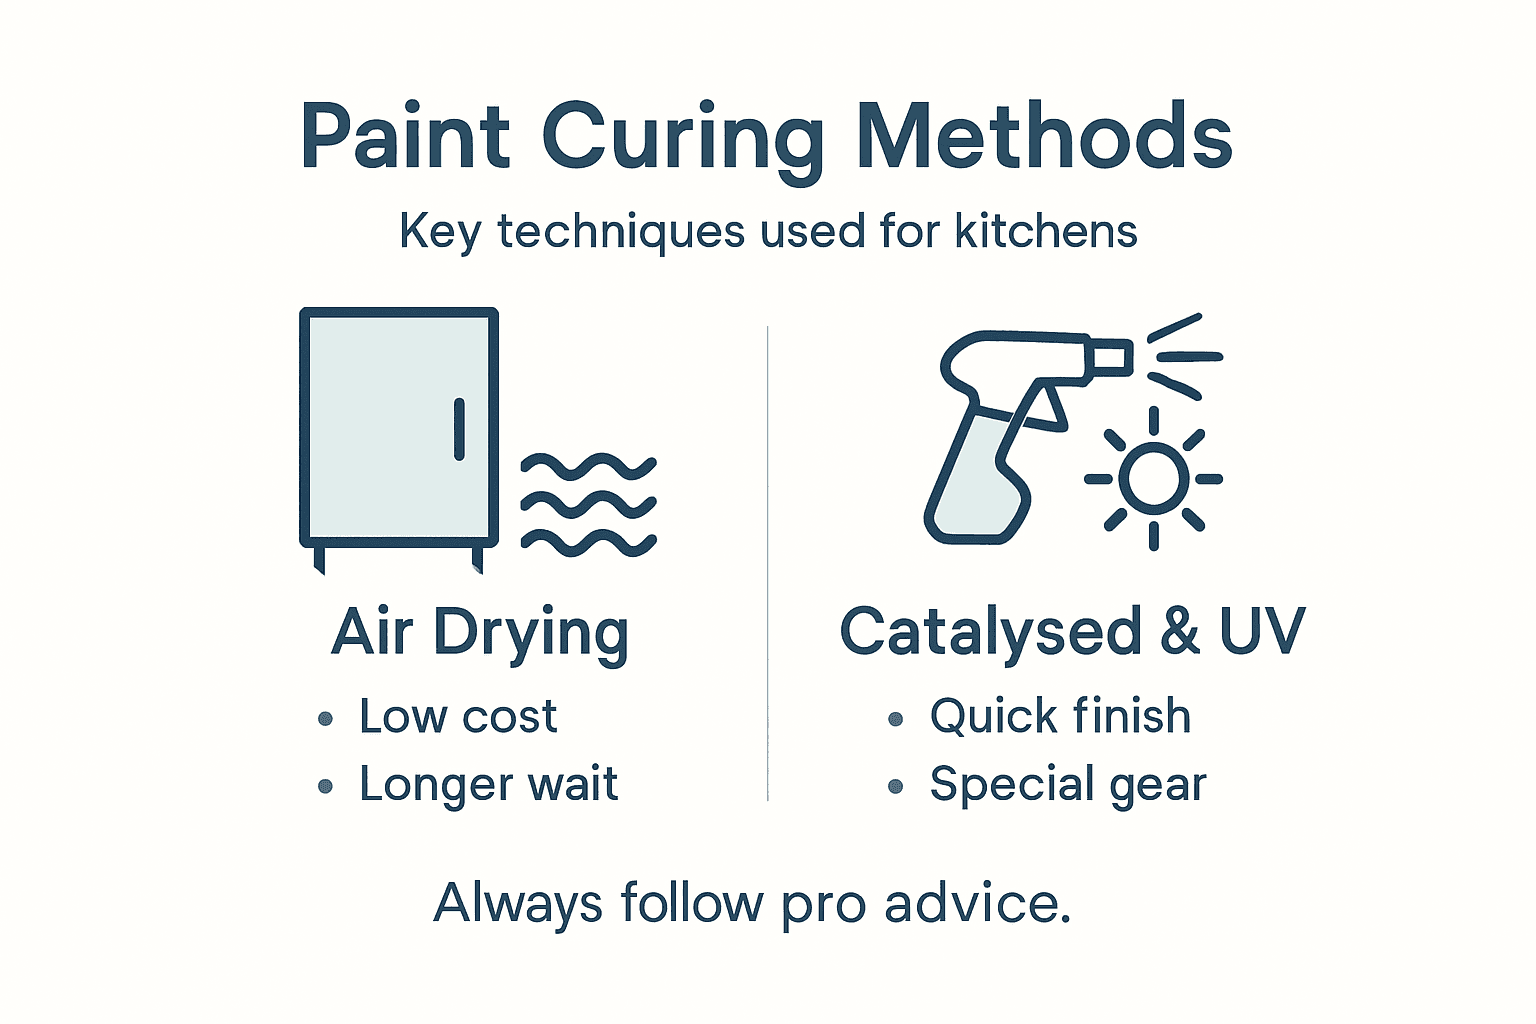
Not all paint curing works the same way. The type of curing used in your kitchen respray directly affects how quickly you can use your kitchen, how durable the finish becomes, and what conditions it can withstand. Understanding the differences helps you know what to expect during the respray process and why your painter might recommend one method over another. The three main curing types are air drying, catalysed curing, and ultraviolet (UV) curing. Each operates through a different chemical mechanism, which has real consequences for your kitchen.
Air drying is the most straightforward approach and the most commonly used for kitchen resprays. With this method, paint hardens as solvents evaporate into the air, leaving behind the paint solids that form your protective coating. This is passive curing – it relies on time, temperature, and ventilation rather than adding anything to speed the process. The advantage is simplicity. No special equipment is needed, and the paint behaves predictably in normal kitchen conditions. The disadvantage is patience. Air drying typically requires one to four weeks for full curing, depending on paint type, thickness, and environmental conditions. During this time, your kitchen must remain relatively quiet, with minimal steam exposure and gentle handling of cabinets. Catalysed curing takes a different approach entirely. Here, a chemical hardener or catalyst is mixed into the paint before application. This catalyst triggers a chemical reaction between the paint components, causing them to bond together much faster than air evaporation alone. Catalysed systems offer enhanced chemical resistance and typically cure to full hardness within days rather than weeks. For kitchen applications, this is a significant advantage because you regain access to your space far more quickly. The trade off is precision. Catalysed paints must be mixed in exact ratios, and once mixed, they have a limited working time before the chemical reaction becomes too advanced for application.
Ultraviolet curing represents the fastest option, though it is less common for residential kitchen resprays. UV curing uses ultraviolet radiation to trigger rapid polymerisation, hardening paint in minutes to hours rather than days or weeks. Specialized UV-reactive chemicals in the paint respond instantly to UV exposure, creating an exceptionally hard, durable finish. Industrial and commercial applications favour UV curing because of the speed and energy efficiency. However, UV curing requires specialized equipment and controlled conditions. Standard kitchen resprays rarely use this method because UV light must reach all surfaces uniformly, and complex cabinet geometries create shadows that do not cure properly. For most homeowners planning a kitchen respray, air drying or catalysed curing will be your options.
The choice between air and catalysed curing often comes down to your circumstances and patience level. Air drying costs less and requires no special preparation, but demands several weeks of careful kitchen use. Catalysed curing accelerates the timeline dramatically, allowing near normal use within days, though the paint may carry a slight chemical smell during curing. Your professional painter will advise which suits your kitchen best based on factors like ventilation, usage patterns, and how quickly you need the space functional again. Regardless of which method is used, do not rush the curing process. Properly cured paint, whether air dried or catalysed, becomes far more resistant to the moisture, grease, and temperature swings your kitchen constantly throws at it. Cutting corners on curing time is precisely how kitchen resprays fail prematurely.
Pro tip: Ask your painter which curing method they recommend for your specific kitchen, and confirm the full curing timeframe before work begins so you can plan your cooking arrangements accordingly.
Here’s how the main kitchen paint curing methods differ in practice:
| Curing Method | Typical Time to Full Cure | Equipment Needed | Pros | Cons |
|---|---|---|---|---|
| Air Drying | 1–4 weeks | None | Simple, low cost | Long wait, sensitive to conditions |
| Catalysed Curing | 2–5 days | Mixing kit | Fast cure, strong finish | Must mix precisely, working time short |
| Ultraviolet (UV) Cure | Minutes to hours | Special UV lamp | Fastest, extremely durable | Specialist tools, impractical at home |
Differences Between Drying and Curing
This distinction separates successful kitchen resprays from failed ones. Many homeowners assume their painted cabinets are ready for use once the surface feels dry to touch. That assumption has ruined countless kitchen resprays. Drying and curing are not the same thing, and conflating them is a costly mistake. Drying is what you see happening visually. It is the physical evaporation of solvents or water from the paint surface, leaving behind a finish that looks complete and feels solid to the touch. You can see the paint go from wet to dry within hours. Curing, by contrast, is invisible chemical work happening beneath that dry surface. It is the ongoing polymerisation or cross-linking of paint molecules that creates true hardness, resilience, and resistance to kitchen conditions. Paint can absolutely feel dry but remain uncured and dangerously vulnerable to damage.
Think of drying like a wet shirt hanging on a line. After a couple of hours in the sun, it feels dry. You can wear it. But the fabric fibres are still settling and rearranging at a molecular level. Curing is when those fibres reach their final, stable state where they resist stretching, staining, and wear. A painted kitchen cabinet works similarly. The surface dries quickly, appearing ready for use. But beneath that dry surface, the paint molecules are still bonding together, filling microscopic gaps, and building the chemical structure that will eventually resist steam, grease, and temperature fluctuations. The full chemical reaction process provides strength and durability that extends far beyond what drying alone provides. Using your kitchen before this process completes means subjecting uncured paint to conditions it cannot yet withstand. Steam condenses on cabinet doors and penetrates the uncured layer. Grease splatters and binds to the tacky surface. Heat from cooking softens partially cured paint. Each of these stresses leaves permanent marks or causes paint to peel and fail.
Curing conditions matter far more than most homeowners realise. Temperature, humidity, and ventilation during the curing period directly determine whether your paint reaches its full potential or remains compromised. Proper curing conditions such as temperature and humidity significantly impact performance and lifespan. Cold kitchens cure slowly. Damp kitchens cure unevenly. Poorly ventilated spaces trap solvents, preventing the chemical reactions that must occur. This is why your painter will advise keeping windows open and maintaining steady conditions during the curing period. The curing timeline varies depending on paint type and circumstances, but generally you should assume several weeks before your kitchen is truly ready for normal use. Some paint manufacturers provide a “touch dry” time, a “hard dry” time, and a “full cure” time. Touch dry might be four hours. Hard dry might be 24 hours. Full cure might be 28 days. That final number is what matters. Using your kitchen after hard dry but before full cure is how you end up with cabinets that look acceptable for six months and then mysteriously develop stains, soft spots, or peeling edges.
The practical consequence is planning. When you schedule a kitchen respray, you are not just paying for application time. You are investing in several weeks where your kitchen requires special treatment. You cannot ignore this reality. The difference between respray success and failure often comes down to whether homeowners respected the full curing timeline or tried to shortcut it. Your painter can spray perfect paint on perfect surfaces, but if you subject that finish to normal kitchen use too early, the outcome is predetermined. Patience during curing is not optional. It is the foundation of a kitchen respray that lasts years rather than months.
Pro tip: Mark the full cure date on your calendar before the respray begins, and treat your kitchen gently until that date arrives—avoid cooking with steam-producing methods, keep cabinet doors closed when not needed, and maintain consistent room temperature and ventilation throughout the entire curing period.
Factors Affecting Curing in Real Homes
Your kitchen is not a laboratory. It is a living, breathing space with fluctuating conditions that rarely align with ideal curing circumstances. Temperature swings, humidity changes, cooking steam, and varying ventilation all conspire to speed up, slow down, or compromise paint curing. Understanding these real-world factors helps you anticipate challenges and take steps to minimise their impact on your respray. The most significant factor in kitchen environments is humidity. Kitchens are naturally damp spaces. Boiling water for pasta, running a shower, even washing up creates moisture in the air. This moisture directly interferes with paint curing. When humidity climbs too high, especially in poorly ventilated kitchens, water molecules interfere with the chemical bonding happening within the paint layer. Instead of paint molecules cross-linking properly, water gets trapped between paint layers, causing bubbling, peeling, or a soft finish that never truly hardens. High indoor humidity is particularly common in British kitchens, especially during winter months when windows stay closed. If your kitchen already struggles with condensation on windows, you can expect slower curing and higher risk of paint failure. This is not a minor inconvenience. It is a threat to the entire respray investment.
Ventilation directly counteracts humidity problems. Without adequate airflow, moisture hangs in the kitchen air and settles on freshly painted surfaces. With proper ventilation, moisture escapes and solvents evaporate as intended, allowing the chemical curing process to proceed normally. Your kitchen needs active ventilation during and after the respray work. This means opening windows, running extraction fans, and maintaining airflow even when it feels cold or inconvenient. Many homeowners make the mistake of closing up their kitchens to “keep the heat in” during winter resprays. This sabotages curing. Proper ventilation reduces moisture accumulation, promoting better paint curing and performance. For at least 48 hours after spraying, your kitchen should feel distinctly draughty. After that initial period, you can reduce ventilation slightly, but maintain steady airflow throughout the full curing period. Temperature is another critical factor. Paint cures faster in warmer conditions and slower in cold ones. A kitchen at 20 degrees Celsius will cure noticeably slower than one at 25 degrees. This becomes problematic during autumn and winter when British homes naturally run cooler. Some homeowners turn down heating to save money during a respray, which directly extends curing time and increases the risk of moisture problems. Conversely, excessive heat can cause solvents to evaporate too quickly, potentially trapping moisture or creating uneven curing. Aim for steady, moderate temperatures between 18 and 25 degrees throughout the curing period.
Surface preparation before spraying affects curing outcomes too. If the underlying cabinet surface still carries dust, grease, old paint flakes, or other contaminants, the new paint cannot bond properly. Poor adhesion means the paint never fully cures because it is not chemically boncing to a clean substrate. It simply sits on top of the mess, vulnerable to peeling. This is why professional painters spend considerable time preparing surfaces before spraying. They strip old finishes, degrease, sand, and clean meticulously. Your painter should provide details about their preparation process. If preparation seems rushed, curing performance suffers regardless of paint quality.
Damp and moisture problems in your home infrastructure create additional challenges. If your kitchen has existing damp issues, rising damp, or water ingress from outside, paint curing becomes nearly impossible in affected areas. Poor ventilation, condensation, and water ingress affect interior paint curing integrity. Paint applied to damp substrate or in persistently damp areas will bubble, peel, and fail within months. If your kitchen has damp problems, addressing those before respraying is essential. A professional painter should inspect for damp and advise you if it needs treatment before work begins. Ignoring existing damp and hoping paint will seal it is a recipe for failure.
Your kitchen environment right now, before respraying, tells you what to expect during curing. If your kitchen is warm, well ventilated, and reasonably dry, curing will proceed smoothly within the expected timeframe. If it is cold, poorly ventilated, or naturally damp, plan for extended curing time and take deliberate steps to improve conditions. The investment in managing these factors during curing is minimal compared to the cost of a failed respray.
Pro tip: Before scheduling your respray, spend a week observing your kitchen’s moisture and ventilation patterns: open windows for 24 hours and note whether condensation reduces, check if extraction fans remove steam effectively, and feel whether temperature stays reasonably steady; address any significant problems before the respray work begins.
Consider these common home factors and their impact on paint curing success:
| Home Condition | Effect on Curing | How to Minimise Risk |
|---|---|---|
| High humidity | Slows or prevents | Boost ventilation, use extraction fans |
| Inconsistent temperature | Uneven curing | Keep kitchen within 18–25°C range |
| Poor ventilation | Traps solvents | Open windows, circulate air throughout |
| Existing damp or leaks | Promotes bubbling | Fix structural issues before respraying |
Mistakes That Compromise Paint Durability
Most kitchen respray failures are not caused by bad paint or poor application. They result from preventable mistakes made before, during, or after the spraying process. These errors might seem minor in the moment, but they compound over weeks and months, eventually causing your investment to fail. Understanding these pitfalls gives you the knowledge to protect your respray and ensure it lasts for years rather than struggling within months. The most common mistake is rushing surface preparation. Your cabinets might look clean on the surface, but microscopic dust, grease residue, and old paint flakes remain invisible to the naked eye. When new paint goes over these contaminants, it cannot bond properly to the underlying surface. The paint sits on top of the mess like wallpaper pasted over dirt. Within weeks, that paint starts peeling. This is not a durability issue with the paint itself. It is adhesion failure caused by poor surface prep. Professional painters invest considerable time in preparation: stripping old finishes, degreasing thoroughly, sanding to create texture for paint adhesion, and cleaning meticulously. If your painter rushes this stage or seems to skip steps, durability suffers dramatically. Poor surface preparation and inadequate contaminant control lead to adhesion failure. Ask your painter to describe their exact preparation process before work begins. A thorough answer suggests competence. A vague one suggests corners are being cut.
Another critical mistake is not respecting the curing timeline. This is where most homeowners sabotage their own respray. The paint looks dry after 24 hours. It feels hard to touch. Your kitchen looks beautiful. So you resume normal use. You cook. Steam rises. Grease splatters. You think to yourself that the paint survived these conditions, so it must be cured. Wrong. The paint has dried but not cured. Using your kitchen during the curing period is like putting a freshly printed photograph in direct sunlight before the ink has fully bonded. The colours fade. The image degrades. Your paint responds the same way. Steam penetrates uncured layers, causing soft spots and discoloration. Grease binds to sticky paint surfaces, creating permanent stains. Temperature swings stress uncured paint, causing cracking. Worst of all, these problems often do not appear immediately. You use your kitchen normally for three weeks, then stains start appearing. Soft spots develop. You think something went wrong with the paint application, when the reality is that you subjected uncured paint to stress it could not yet handle. Skipping the curing period or not controlling humidity and temperature leads to compromised strength and durability. Full curing typically requires two to four weeks depending on paint type. Plan your kitchen respray during a period when you can cook minimally, avoid steam exposure, and tolerate an inconvenience.
Poor ventilation during and after spraying creates another durability problem. Without adequate airflow, moisture and solvents become trapped. Improper painting technique and lack of adequate ventilation during curing leads to uneven curing, soft finishes, and potential moisture-related defects. You need windows open or extraction fans running actively for at least 48 hours after spraying. Then maintain steady ventilation throughout the full curing period. Yes, this feels cold and uncomfortable, especially in winter. Yes, it costs money in heating. But the alternative is paint that never fully hardens and fails prematurely. Some homeowners also make the mistake of using the wrong paint type for kitchen conditions. Not all paints are equal. A paint formulated for interior walls might not stand up to kitchen moisture and grease exposure. Specialist kitchen paints exist for a reason. They contain additives that resist moisture, repel grease, and withstand temperature swings. Your painter should specify which paint they recommend and why. If they say paint is paint and any brand will do, you have a red flag.
Finally, never attempt to speed up curing artificially. Some homeowners blast heaters to warm their kitchens, thinking heat accelerates curing. Excessive heat actually causes solvents to evaporate too quickly, trapping moisture and creating weak paint layers. Others open windows excessively, which is good for ventilation but problematic if it creates draughts that dry paint unevenly. Patience during curing is not a weakness. It is an investment in paint durability. The weeks you spend treating your kitchen gently are the difference between a respray that lasts five years and one that fails after eighteen months.
Pro tip: Before your respray begins, write down your full curing timeline, identify which cooking methods produce the most steam, and plan alternative meals or eating out during the critical first two weeks so you are not tempted to use your oven or hob while the paint is still curing.
Protect Your Kitchen Investment With Expert Respray Services
Understanding the vital difference between drying and curing is key to ensuring your kitchen respray lasts for years. Many homeowners struggle with premature paint failure because they overlook the importance of proper curing conditions such as ventilation, temperature control, and patience. At SKR Specialists, we not only apply premium kitchen respray finishes but also guide you through the crucial curing process to protect your investment against moisture, steam, and grease—the exact challenges highlighted in this article.

Choose a professional team that respects every stage of paint curing to deliver a durable, beautiful kitchen transformation. Visit SKR Specialists to learn more about our expert kitchen respray services and how we ensure your kitchen cabinets achieve full chemical hardness. Don’t risk your respray failing prematurely. Contact us today to schedule your consultation and plan for a flawless curing period with our guided support. Your kitchen deserves the best care from start to finish.
Frequently Asked Questions
What is the difference between paint drying and curing?
Drying refers to the evaporation of solvents or water from the paint’s surface, making it feel dry to the touch within hours. Curing is the chemical process that takes place underneath the surface, where the paint hardens and gains its full protective qualities. This process can take several weeks, and it is crucial for ensuring the paint can withstand the conditions in a kitchen environment.
How long does it typically take for kitchen paint to fully cure?
The curing time depends on the type of paint used and the kitchen’s conditions. Generally, air-dried paint can take one to four weeks, while catalysed curing methods may only take two to five days. It’s essential to avoid using the kitchen during this time to ensure the paint cures properly.
Why is curing particularly important in kitchen environments?
Kitchens face unique challenges, including moisture from steam, grease, and temperature fluctuations. Proper curing ensures that the paint bonds securely and develops sufficient hardness to resist these elements. An uncured or poorly cured finish may lead to paint failure and damage over time.
What factors can affect the curing process in my kitchen?
Several factors can impact the curing process, including humidity levels, temperature variations, and ventilation. High humidity can slow curing or cause bubbles in the paint, while inadequate ventilation can trap moisture. Keeping the kitchen well-ventilated and maintaining moderate temperatures can help ensure the paint cures effectively.