")
Kitchen Respray Step by Step for a Fresh New Look
Most british homeowners overlook how dramatically a fresh respray can transform tired kitchen cabinets for a fraction of a full refit. With the average kitchen makeover in England costing over £7,000, finding affordable alternatives is top of mind for many families. Whether you want a crisp DIY upgrade using step-by-step methods or are curious about hiring professionals for flawless results, this guide breaks down the expert process so you can revive your kitchen with confidence and style.
Table of Contents
- Step 1: Clear And Prepare All Kitchen Surfaces
- Step 2: Sand And Clean Cabinets Thoroughly
- Step 3: Mask And Protect Worktops And Floors
- Step 4: Apply Primer For A Smooth Base
- Step 5: Spray Paint Cabinets For An Even Finish
- Step 6: Inspect And Reassemble Kitchen Components
Quick Summary
| Key Insight | Explanation |
|---|---|
| 1. Thoroughly clear surfaces | Empty all drawers and surfaces to prevent damage during painting and to ensure a clean workspace. |
| 2. Systematic sanding required | Use progressively finer sandpaper to create a smooth surface that allows for better paint adhesion. |
| 3. Use protective materials | Apply masking tape and protective sheets to prevent paint from affecting unwanted areas, ensuring clean edges. |
| 4. Proper priming is crucial | A high-quality primer helps cover imperfections and ensures a uniform base for topcoat application. |
| 5. Inspect before reassembling | Check for flaws in the finish and ensure all cabinets are properly aligned and function smoothly before putting them back. |
Step 1: Clear and prepare all kitchen surfaces
Preparing your kitchen surfaces is the foundational first step in achieving a professional respray finish. This critical phase involves systematically clearing, cleaning, and readying every surface to ensure optimal paint adhesion and a flawless result.
Begin by completely emptying all drawers, cupboards, and countertops. Thorough kitchen decluttering requires sorting items into three distinct categories: items to keep, items to donate, and items to discard. Remove everything from shelves, worktops, and storage areas to create a completely clear workspace. This allows you to access every surface and prevents potential damage to your kitchenware during the respraying process.
Work methodically from the highest points downwards to prevent re-contaminating cleaned areas. Use a soft microfibre cloth to dust extractor fans, ceiling corners, and the tops of cabinets. Next, apply a mild degreaser or white vinegar solution to wipe down cupboard exteriors, splashbacks, and worktops. Ensure you scrub thoroughly and dry each surface completely to remove any grease, grime, or cooking residues that might impede paint adhesion.
Expert Tip: Always use lint-free cloths and change them frequently to prevent transferring dirt back onto your freshly cleaned surfaces.
Here is a summary of key preparation tools and their purposes in kitchen cabinet respraying:
| Tool or Material | Purpose | Why It Matters |
|---|---|---|
| Microfibre cloth | Dust and clean surfaces | Prevents debris affecting finish |
| Masking tape | Seal off protected areas | Ensures crisp paint lines |
| Sandpaper (various grits) | Smooth cabinet surfaces | Promotes lasting paint adhesion |
| Tack cloth | Remove sanding dust | Guarantees a flawless base |
| Foam roller/spray gun | Even primer/paint application | Creates a professional finish |
Step 2: Sand and clean cabinets thoroughly
Sanding and cleaning your kitchen cabinets is a crucial preparatory stage that ensures a professional and long lasting respray finish. This meticulous process removes old finishes, smooths imperfections, and creates an ideal surface for paint adhesion.
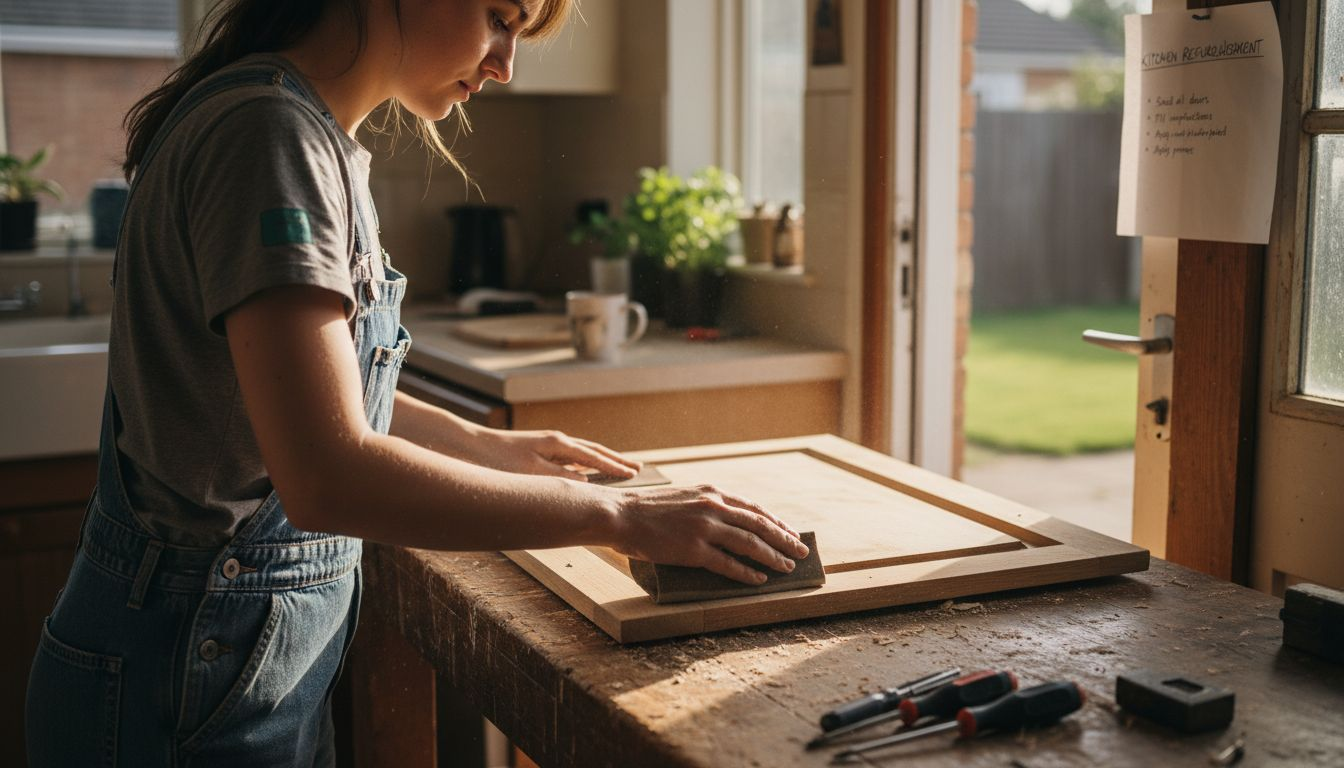
Start by removing all cabinet doors and hardware to provide unrestricted access to every surface. Kitchen cabinet preparation requires systematic sanding using progressively finer grit sandpaper. Begin with medium grit sandpaper to eliminate existing finishes and smooth out surface irregularities. Work carefully and consistently across each surface, ensuring you remove any glossy areas that might prevent paint from adhering properly.
After sanding, thoroughly clean each surface using a tack cloth to remove all dust particles. Wipe down the cabinets with a degreasing solution to eliminate any remaining oils or residues. Pay special attention to areas around handles and edges where grease and dirt tend to accumulate. Allow surfaces to dry completely before proceeding to the next stage of your kitchen respray project.
Expert Tip: Always sand in the direction of the wood grain to prevent unnecessary scratching and ensure a smoother final finish.
Compare the impact of proper cabinet prep versus skipping key preparation stages:
| Approach | Longevity of Finish | Visual Result | Risk of Damage |
|---|---|---|---|
| Full professional preparation | 10+ years predicted | Smooth, flawless look | Minimal |
| Skipping cleaning/sanding | 2-3 years or less | Patchy, peeling areas | High |
Step 3: Mask and protect worktops and floors
Preparing your kitchen for a professional respray involves meticulously protecting surfaces that should not be painted. This crucial step prevents accidental paint splatter and ensures a clean, precise finish while safeguarding your valuable worktops and flooring.
Kitchen respray safety demands comprehensive surface protection. Begin by thoroughly cleaning your worktops and floors to remove any dust or debris that might interfere with masking materials. Use high-quality painter’s masking tape to carefully seal edges where cabinets meet worktops, carefully pressing down the edges to create a tight seal that prevents paint seepage. Cover worktops completely with robust painter’s plastic or specialised masking paper, ensuring no gaps remain exposed.
Extend your protection to the floor by laying down professional grade dust sheets or rosin paper. Secure these materials with painter’s tape, creating a comprehensive barrier that catches any potential paint drips or overspray. Take extra care around edges and corners, overlapping protective materials to create a foolproof shield. Consider using corner guards and additional plastic sheeting to fully encapsulate areas not intended for painting.
Expert Tip: Use masking film with static cling properties for more seamless and secure surface coverage during your kitchen respray project.
Step 4: Apply primer for a smooth base
Priming your kitchen cabinets is a critical stage that sets the foundation for a professional and long lasting paint finish. This preparatory layer ensures better paint adhesion, covers imperfections, and creates a uniform surface for your final colour application.

Primer application techniques require careful preparation and precise execution. Select a high-quality stain blocking primer specifically designed for kitchen cabinets, which will help fill small blemishes and create a smooth base. Use a high-quality foam roller or professional spray equipment for an even application. Apply the primer in thin, consistent layers, working systematically across each surface. Ensure complete coverage while avoiding thick buildup that might create drips or uneven textures.
Allow each primer layer to dry completely before assessing the surface. Lightly sand between coats using fine grit sandpaper to remove any minor imperfections and create an ultra-smooth base for your final paint colour. Pay special attention to filling and smoothing any visible wood grain or surface irregularities. Check the primer application under good lighting to identify and address any uneven areas before proceeding to the final painting stage.
Expert Tip: Choose a primer that matches your final paint colour to reduce the number of topcoat layers required for complete coverage.
Step 5: Spray paint cabinets for an even finish
Spraying kitchen cabinets requires precision, skill, and the right technique to achieve a professional looking finish that transforms your entire kitchen space. This stage demands careful preparation and a methodical approach to ensure smooth, uniform coverage across all surfaces.
Kitchen spray finishes demand professional grade equipment and technique. Select a high quality spray gun with adjustable settings to control paint flow and particle size. Position your spray equipment approximately 15 to 20 centimetres from the surface, maintaining a consistent angle and movement. Apply thin, even coats using a steady sweeping motion from left to right or top to bottom, overlapping each stroke by approximately 50 percent to prevent uneven patches or visible lines.
Work in a well ventilated area with controlled temperature and minimal dust. Allow each coat to dry completely before applying the next layer. Multiple thin layers will provide a more professional finish than a single thick application. Pay special attention to edges, corners, and detailed areas, ensuring complete and uniform coverage. Keep your spray movements smooth and consistent to prevent drips, runs, or uneven texture.
Expert Tip: Practice your spraying technique on a piece of cardboard first to perfect your stroke and understand your equipment’s spray pattern.
Step 6: Inspect and reassemble kitchen components
After completing the respraying process, the final stage involves carefully inspecting and reassembling your kitchen cabinets to restore their full functionality and showcase your professional transformation. This meticulous process ensures every component returns to its precise original position with a pristine new finish.
Kitchen cabinet refinishing requires careful examination of each painted surface under bright lighting. Check for any imperfections, uneven coverage, or minor paint runs. Use fine grit sandpaper to gently smooth out any small irregularities, and perform touch ups with matching paint if necessary. Clean your original hardware thoroughly or consider replacing it to complement your newly refreshed cabinets.
Methodically reattach cabinet doors, ensuring proper alignment and smooth operation. Check that hinges are correctly positioned and tighten all mounting screws securely. Replace drawer fronts and handles with precision, testing each mechanism to confirm it moves smoothly without resistance. Take your time during reassembly to maintain the professional quality of your kitchen respray project.
Expert Tip: Lay out all hardware and components on a clean cloth before reassembly to keep track of each piece and ensure nothing gets misplaced.
Transform Your Kitchen with Expert Respray Services
Achieving a flawless kitchen respray involves precise preparation, expert sanding, careful masking, and professional spray painting techniques. If you have encountered challenges like uneven finishes or worrying over complex steps such as primer application and cabinet reassembly, you are not alone. Many homeowners struggle to master the detailed process described in our Uncategorized Archives – WordPress. Addressing these important stages ensures long-lasting results and a truly fresh new look.

Unlock the full potential of your kitchen by choosing our professional kitchen respray service. We provide in-situ respraying that respects your time and home environment, delivering a smooth, durable finish without the stress of DIY complications. Visit SKR Specialists today to explore how our tailored solutions can bring your vision to life and enjoy expert guidance every step of the way. Start your kitchen transformation now by checking out our comprehensive approach on the Uncategorized Archives – WordPress or learn more about our specialised techniques directly on our homepage.
Frequently Asked Questions
What is the first step in a kitchen respray project?
The first step in a kitchen respray project is to clear and prepare all kitchen surfaces. Begin by completely emptying drawers, cupboards, and countertops to create a clean workspace, allowing for optimal paint adhesion.
How do I properly sand kitchen cabinets before respraying?
To properly sand kitchen cabinets, remove all cabinet doors and hardware first. Use medium grit sandpaper to eliminate old finishes and irregularities, ensuring you sand in the direction of the wood grain for a smoother final finish.
What precautions should I take when masking surfaces before painting?
When masking surfaces, ensure you thoroughly clean worktops and floors to avoid contamination. Use high-quality masking tape to seal edges and cover worktops completely with plastic or masking paper to capture any potential paint drips or overspray.
How do I apply primer for a smooth base on cabinets?
Apply a stain-blocking primer to kitchen cabinets using a high-quality foam roller or spray equipment. Ensure you apply it in thin, even layers, lightly sanding between coats to create a uniform surface for the topcoat.
What technique should I use for spray painting my kitchen cabinets?
For spray painting cabinets, hold the spray gun approximately 15 to 20 centimetres from the surface and use a steady sweeping motion. Apply thin, even coats, allowing each layer to dry completely before adding additional coats for a professional finish.
How should I inspect and reassemble my cabinets after respraying?
Carefully inspect each painted surface under bright lighting for imperfections, then use fine grit sandpaper to smooth out any minor flaws. Reattach cabinet doors and hardware methodically to ensure everything is aligned and operates smoothly.
Recommended
- Kitchen Cabinet Makeover Steps for a Stunning Finish – WordPress
- Kitchen Transformation Guide for a Stunning Respray Finish – WordPress
- Quick Kitchen Respray Process for Fast Makeovers – WordPress
- 7 Smart Kitchen Respray Ideas for a Fresh Look – WordPress
- Jak zaplanować kuchnię – ergonomia i funkcjonalność w praktyce | Przestrzeń Od Nowa