")
Kitchen Spray Paint Application Guide for Flawless Results
Giving your kitchen a fresh look does not have to mean expensive renovations or calling in the professionals. Many homeowners in England discover that a smooth, long lasting finish comes down to proper surface preparation and the right painting technique. When you take the time to clean, sand, and set up your workspace with care, your spray paint project can rival results from top kitchen respray services.
Table of Contents
- Step 1: Prepare Kitchen Surfaces For Spray Painting
- Step 2: Set Up Workspace And Protect Surrounding Areas
- Step 3: Choose And Mix The Correct Spray Paint
- Step 4: Apply Spray Paint Evenly To Cabinets
- Step 5: Inspect And Touch Up For A Perfect Finish
Quick Summary
| Key Insight | Explanation |
|---|---|
| 1. Thoroughly clean surfaces | Use a degreasing solution to remove all grease and grime for better paint adhesion. |
| 2. Choose the right spray paint | Select specialist furniture paint suited for kitchen surfaces to enhance durability and finish. |
| 3. Apply multiple thin layers | Instead of a thick coat, use several thin layers to avoid drips and achieve an even finish. |
| 4. Inspect and touch up thoroughly | After painting, check in natural light for defects and touch up for a flawless look. |
| 5. Protect surrounding areas | Use quality masking materials to cover adjacent surfaces and prevent unwanted paint overspray. |
Step 1: Prepare kitchen surfaces for spray painting
Preparing your kitchen surfaces correctly is crucial for achieving a professional spray paint finish that looks smooth and lasts for years. Surface preparation determines whether your respray will look amateurish or impressively polished.
Begin by thoroughly cleaning your kitchen surfaces using a degreasing solution. Kitchen cabinets accumulate layers of cooking residue, oils, and grime that can prevent paint adhesion. Comprehensive surface preparation techniques recommend removing all contaminants to ensure optimal paint bonding. Use a strong kitchen degreaser or white spirit and lint-free cloths to remove every trace of grease. Work methodically from top to bottom, ensuring no area is missed.
Next, assess the surface condition and repair any imperfections. Sand wooden surfaces using fine-grit sandpaper to create a smooth, even texture that allows paint to grip effectively. Fill small holes or dents with wood filler, allowing sufficient drying time before sanding the repaired areas flush. Wipe away all sanding dust with a tack cloth to create an immaculate surface ready for spray painting.
Kitchen Expert Tip: Always wear protective gloves and work in a well-ventilated space when preparing surfaces to protect yourself from chemical cleaners and dust particles.
Step 2: Set up workspace and protect surrounding areas
Preparing your workspace is a critical step in achieving a professional kitchen spray paint finish. Your goal is to create a controlled environment that prevents overspray and protects areas not intended for painting.
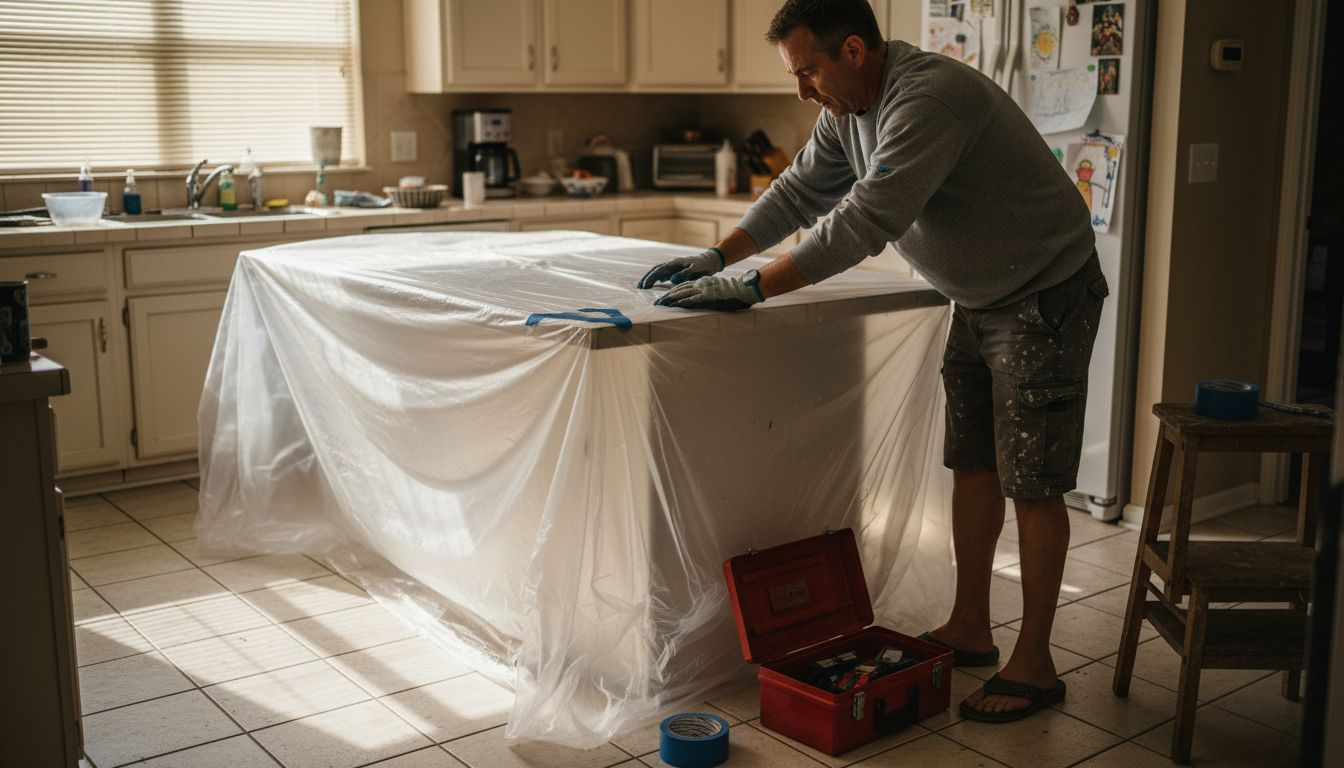
Comprehensive workspace protection techniques emphasise the importance of creating a carefully controlled painting zone. Start by clearing the kitchen area completely. Remove small appliances, decorative items, and any movable objects. Cover countertops, floors, and adjacent walls with quality masking paper or plastic sheeting, ensuring complete coverage. Use painter’s masking tape to secure coverings tightly, creating a seamless barrier against potential paint drift. Pay special attention to areas near electrical outlets, light switches, and any fixed appliances.
Create a dedicated spray painting zone with optimal ventilation. Choose a well-lit area with minimal air movement to prevent dust and debris from settling on wet paint. If possible, set up your workspace near an open window or use portable fans to maintain gentle air circulation. Lay down a clean drop cloth or plastic sheeting on the floor to catch any potential paint drips and make cleanup easier.
Kitchen Expert Tip: Invest in high-quality masking materials and take your time with preparation to save hours of potential cleanup and touch-up work later.
Step 3: Choose and mix the correct spray paint
Selecting the right spray paint is crucial for achieving a professional kitchen transformation that will withstand daily wear and moisture exposure. Your paint choice determines not just the aesthetic appeal but also the long-term durability of your kitchen surfaces.
Kitchen cabinet painting techniques recommend using specialist furniture paints designed specifically for high-traffic areas like kitchens. Look for spray paints that offer moisture resistance, excellent adhesion, and a finish that can withstand frequent cleaning. Consider the existing surface material whether wooden, laminate, or metal and choose a paint formulated for that specific substrate. Opt for semi gloss or gloss finishes which are easier to clean and more resistant to kitchen grease and splashes.
To help you select the best spray paint for your kitchen surfaces, see this quick comparison:
| Paint Type | Durability | Cleaning Ease | Best Surface Material |
|---|---|---|---|
| Specialist furniture | High resistance | Easy to wipe | Wood or laminate |
| Multi-surface | Moderate durability | Needs care | Metal or plastic |
| Moisture-resistant | Excellent for kitchens | Very easy | All, especially near sinks |
Before painting, thoroughly shake your spray paint can for at least two minutes to ensure proper pigment distribution. Hold the can approximately 20 centimetres from the surface and apply in smooth, overlapping strokes. Work in a steady, consistent motion to prevent drips and achieve an even coating. Multiple thin layers are always preferable to one thick application which can lead to uneven coverage and potential running.
Kitchen Expert Tip: Test your chosen spray paint colour on a small inconspicuous area or sample board first to confirm the exact shade and finish before committing to the entire kitchen surface.
Step 4: Apply spray paint evenly to cabinets
Applying spray paint to kitchen cabinets requires precision and technique to achieve a professional finish that looks seamless and lasts for years. Your goal is to create a smooth, uniform coating without drips, runs, or uneven patches.

Kitchen unit painting techniques emphasise maintaining a consistent spray distance and motion. Position yourself approximately 20 centimetres from the cabinet surface and move the spray can in steady, parallel strokes. Start spraying slightly before the surface and continue past the edge to prevent unintended thick build-up at the start and end points. Overlap each pass by about 50 percent to ensure complete coverage without creating heavy spots.
Apply multiple thin layers rather than one thick coat. Allow each layer to dry for 10 to 15 minutes between applications, keeping the spray can moving continuously to prevent pooling or dripping. Work systematically across each cabinet door or panel, maintaining the same angle and speed throughout. Pay special attention to edges, corners, and detailed areas where paint can easily accumulate unevenly. Rotate cabinet doors if possible to ensure comprehensive and uniform coverage from all angles.
Kitchen Expert Tip: Practice your spraying technique on a piece of cardboard first to develop a consistent motion and understand how your specific spray paint behaves.
Here is a summary of common spray painting mistakes and how to avoid them:
| Mistake | Consequence | Recommended Solution |
|---|---|---|
| Applying thick coats | Drips and sagging | Use several thin layers |
| Inadequate surface prep | Poor paint adhesion | Clean and sand thoroughly |
| Insufficient ventilation | Dust on wet paint | Work in well-ventilated area |
Step 5: Inspect and touch up for a perfect finish
Achieving a flawless kitchen respray requires careful inspection and strategic touch-ups to ensure a professional-looking result. Your final review will transform a good paint job into an exceptional one.
Kitchen unit painting techniques recommend thoroughly examining the painted surface in bright, natural light to reveal any subtle imperfections. Wait at least 24 hours after your final coat before conducting a detailed inspection. Look closely for drips, uneven coverage, thin patches, or areas where the original surface shows through. Use fine grit sandpaper to gently smooth out minor inconsistencies, taking care not to remove too much paint.
For small touch-ups, use the same spray paint used in the original application. Hold the can at the same distance and angle as your initial application, and apply light, quick passes to blend the new paint seamlessly. Focus on creating smooth transitions between the original paint and touch-up areas. Work in a well-ventilated space and allow sufficient drying time between touch-up applications. If significant areas require correction, it may be more effective to respray the entire cabinet door or panel for a uniform finish.
Kitchen Expert Tip: Keep leftover spray paint in a cool, dry place for future touch-ups and store with the nozzle pointing upwards to prevent clogging.
Transform Your Kitchen with Expert Spray Painting Services
Spray painting kitchen cabinets offers a refreshing and affordable way to breathe new life into your space, but as the guide highlights, challenges like surface preparation, correct paint selection, and flawless application can be daunting. Avoid common pitfalls such as poor paint adhesion, drips, and uneven coverage by trusting professionals who understand these critical steps and the importance of in-situ respray for lasting, high-quality results.

Ready to enjoy a stunning kitchen transformation without the stress of DIY mistakes? Explore our Uncategorized Archives to learn more about how professional techniques elevate finishes. Then visit SKR Specialists to book a consultation and experience expert kitchen respray services tailored to your needs. Act now to protect your investment and achieve flawless results with minimal disruption.
Frequently Asked Questions
How do I prepare my kitchen surfaces for spray painting?
To prepare your kitchen surfaces, begin by thoroughly cleaning them with a degreasing solution to remove oils and grime. Follow this by assessing for any imperfections and sanding wooden surfaces to create a smooth texture, ensuring optimal paint adhesion.
What steps should I take to set up my workspace for spray painting?
Clear your kitchen area completely, removing any movable objects. Cover counters, floors, and walls with masking materials, ensuring all areas are protected, and create a well-ventilated painting zone to minimise dust and debris on wet paint.
Which spray paint should I use for kitchen cabinets?
Choose a specialist furniture spray paint that offers moisture resistance and good adhesion, preferably with a semi-gloss or gloss finish. This type of paint is designed for high-traffic kitchen areas and can withstand frequent cleaning.
How do I apply spray paint evenly to achieve a professional finish?
Maintain a consistent distance of about 20 centimetres from the cabinet surface while spraying in steady, parallel strokes. Apply multiple thin layers, allowing each layer to dry for 10 to 15 minutes before applying the next, to avoid runs and achieve an even finish.
What should I look for when inspecting my painted kitchen surfaces?
Inspect your painted surfaces in bright, natural light at least 24 hours after painting. Look for any drips, uneven coverage, or thin patches, and use fine-grit sandpaper to smooth out any minor imperfections before performing touch-ups.
How can I perform touch-ups effectively after the initial spray painting?
Use the same spray paint as the initial job for touch-ups and hold the can at the same distance and angle to blend areas seamlessly. Apply light, quick passes to create smooth transitions and allow adequate drying time between touch-up applications.